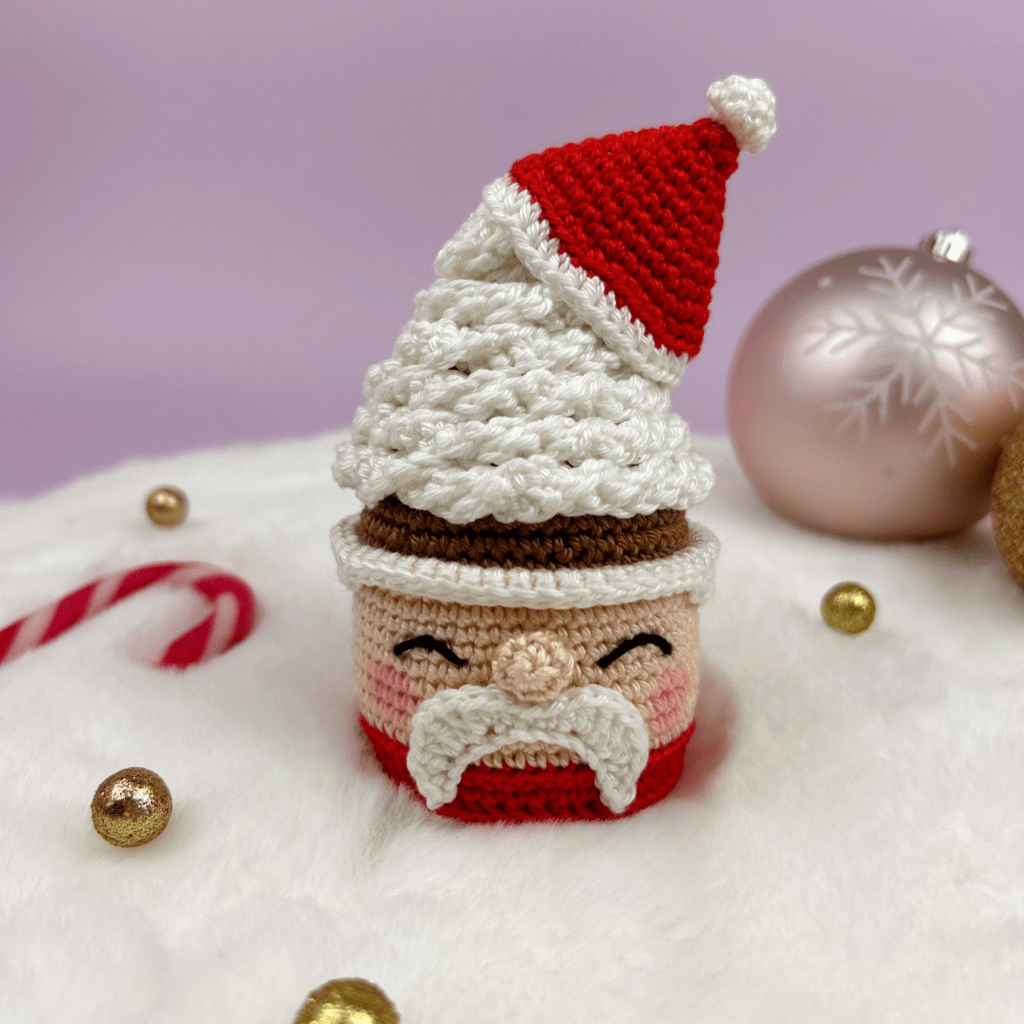
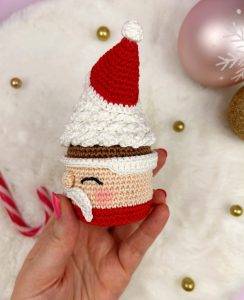
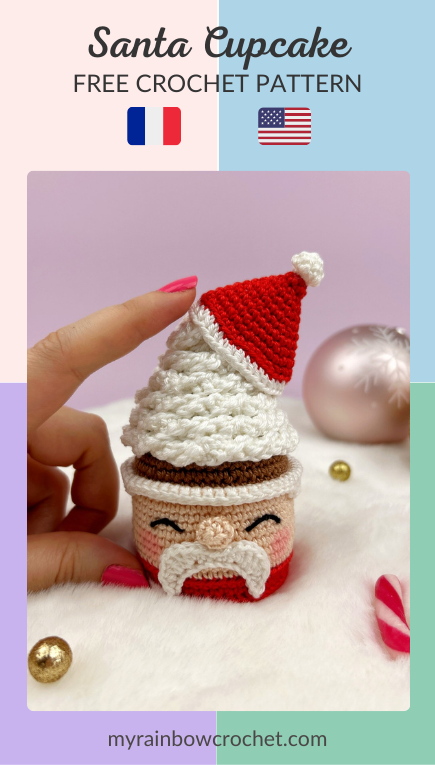
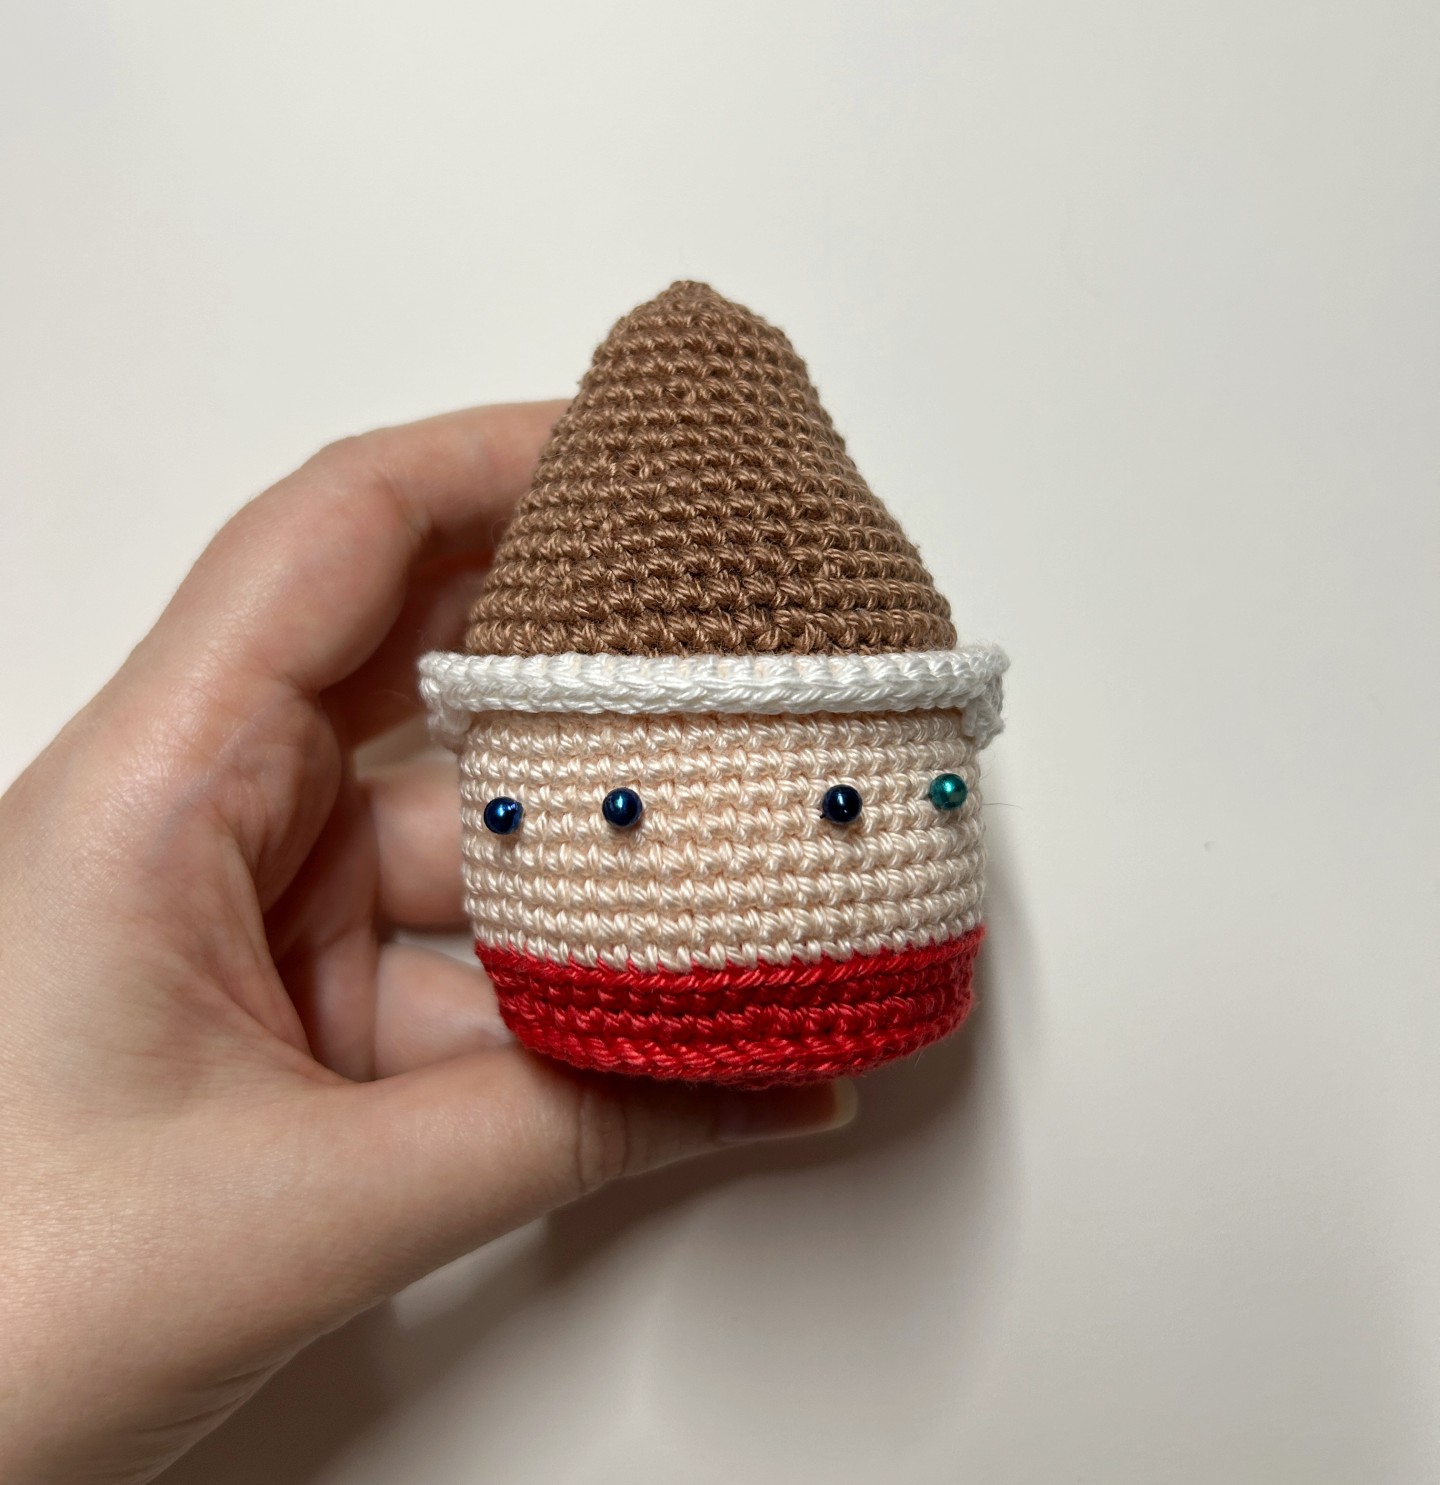
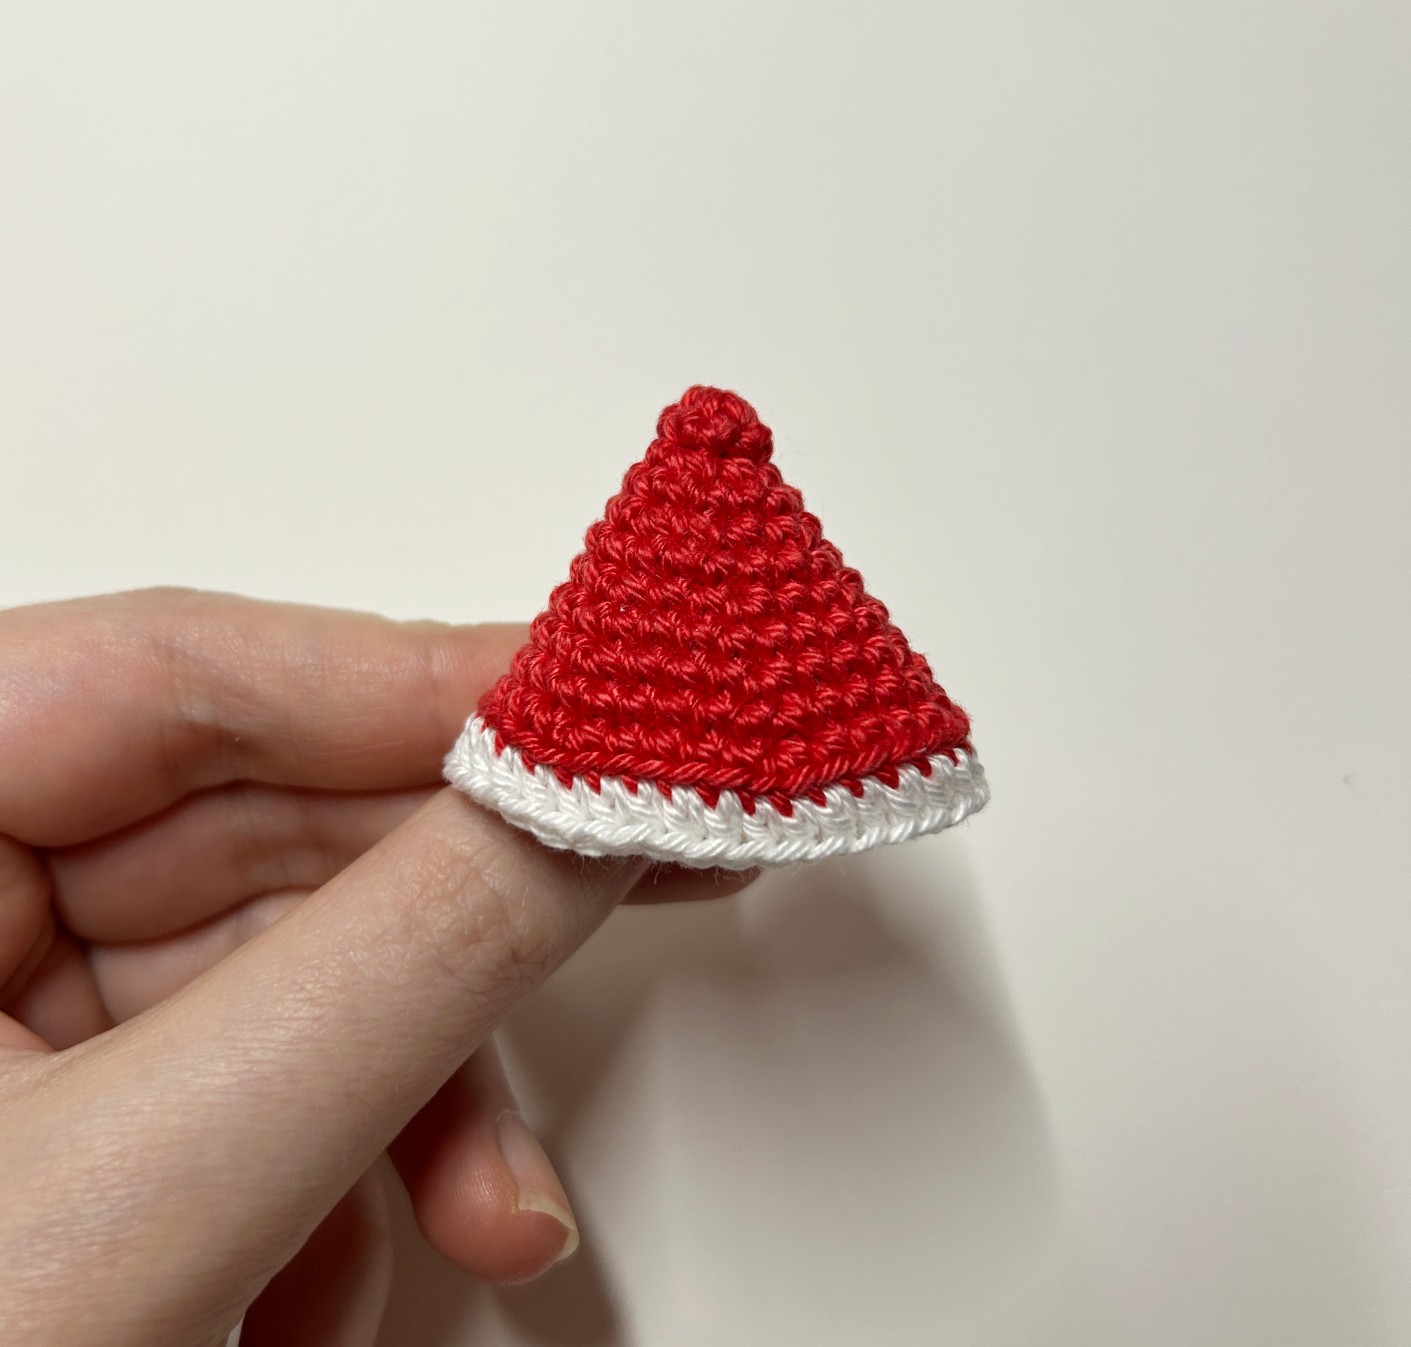
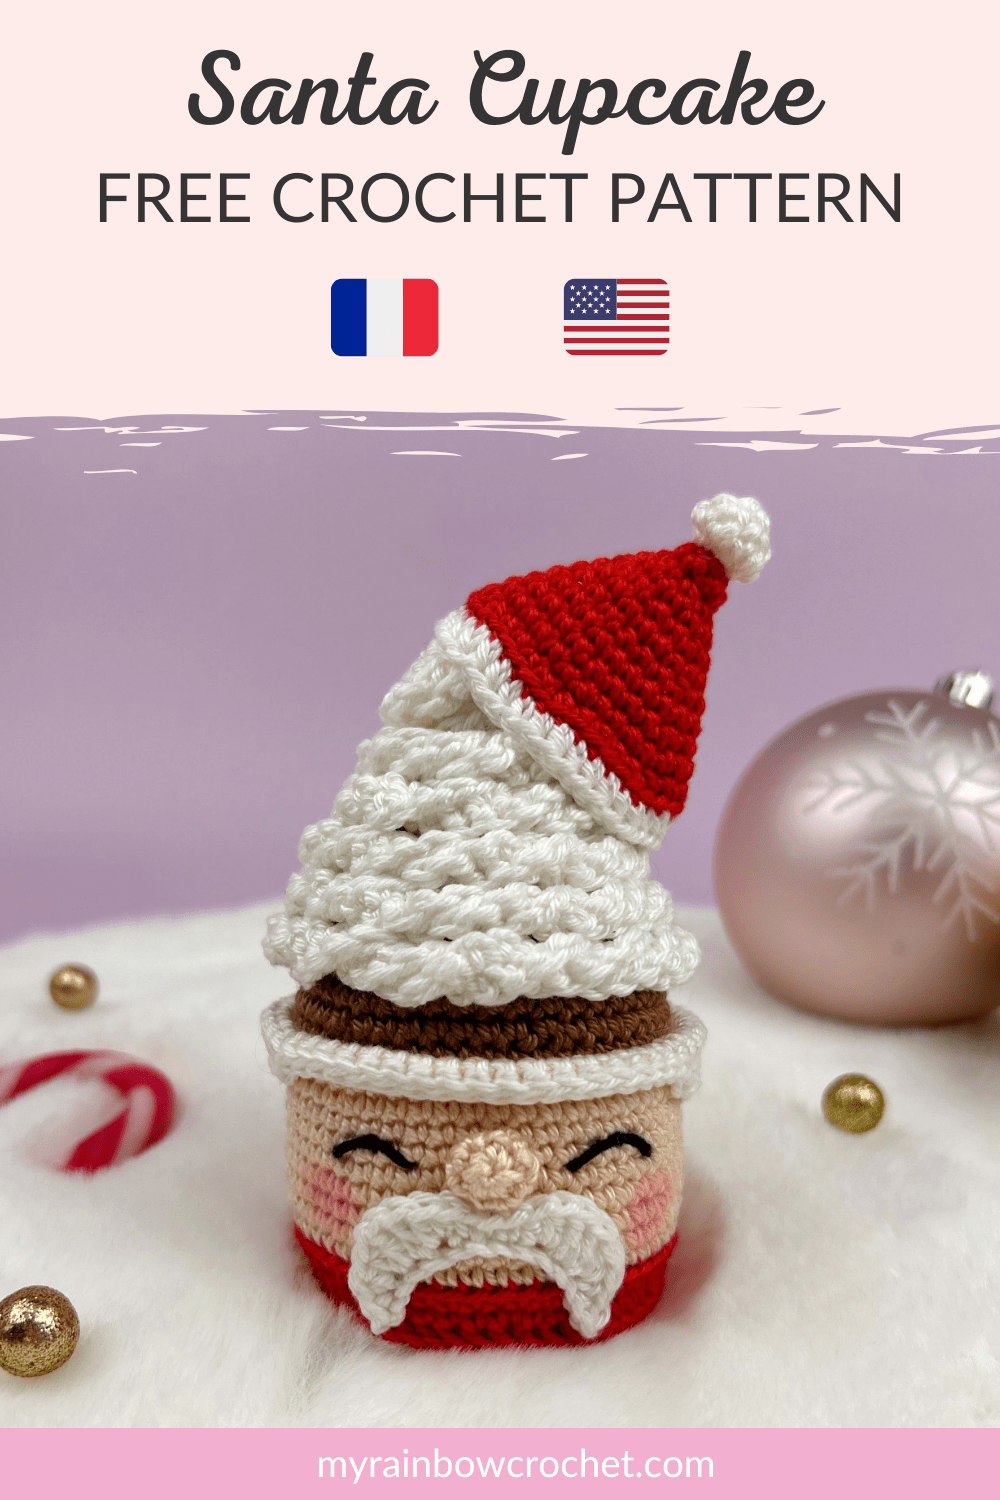
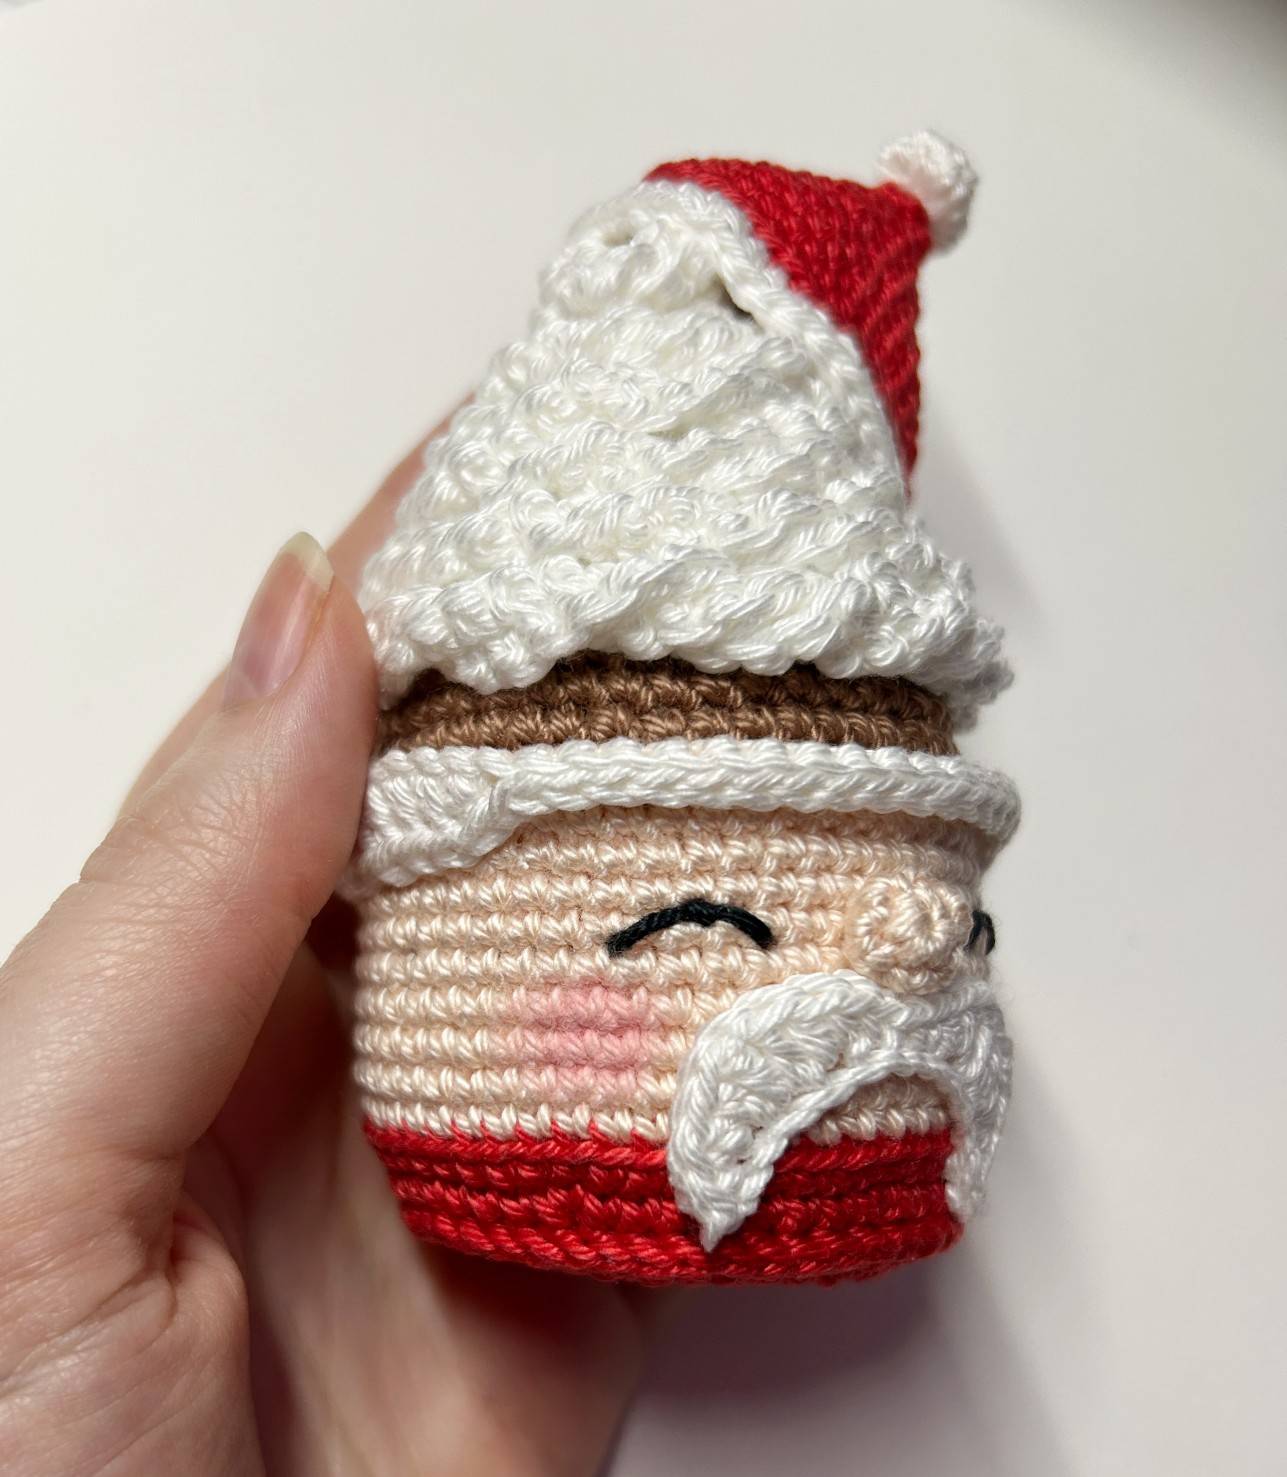
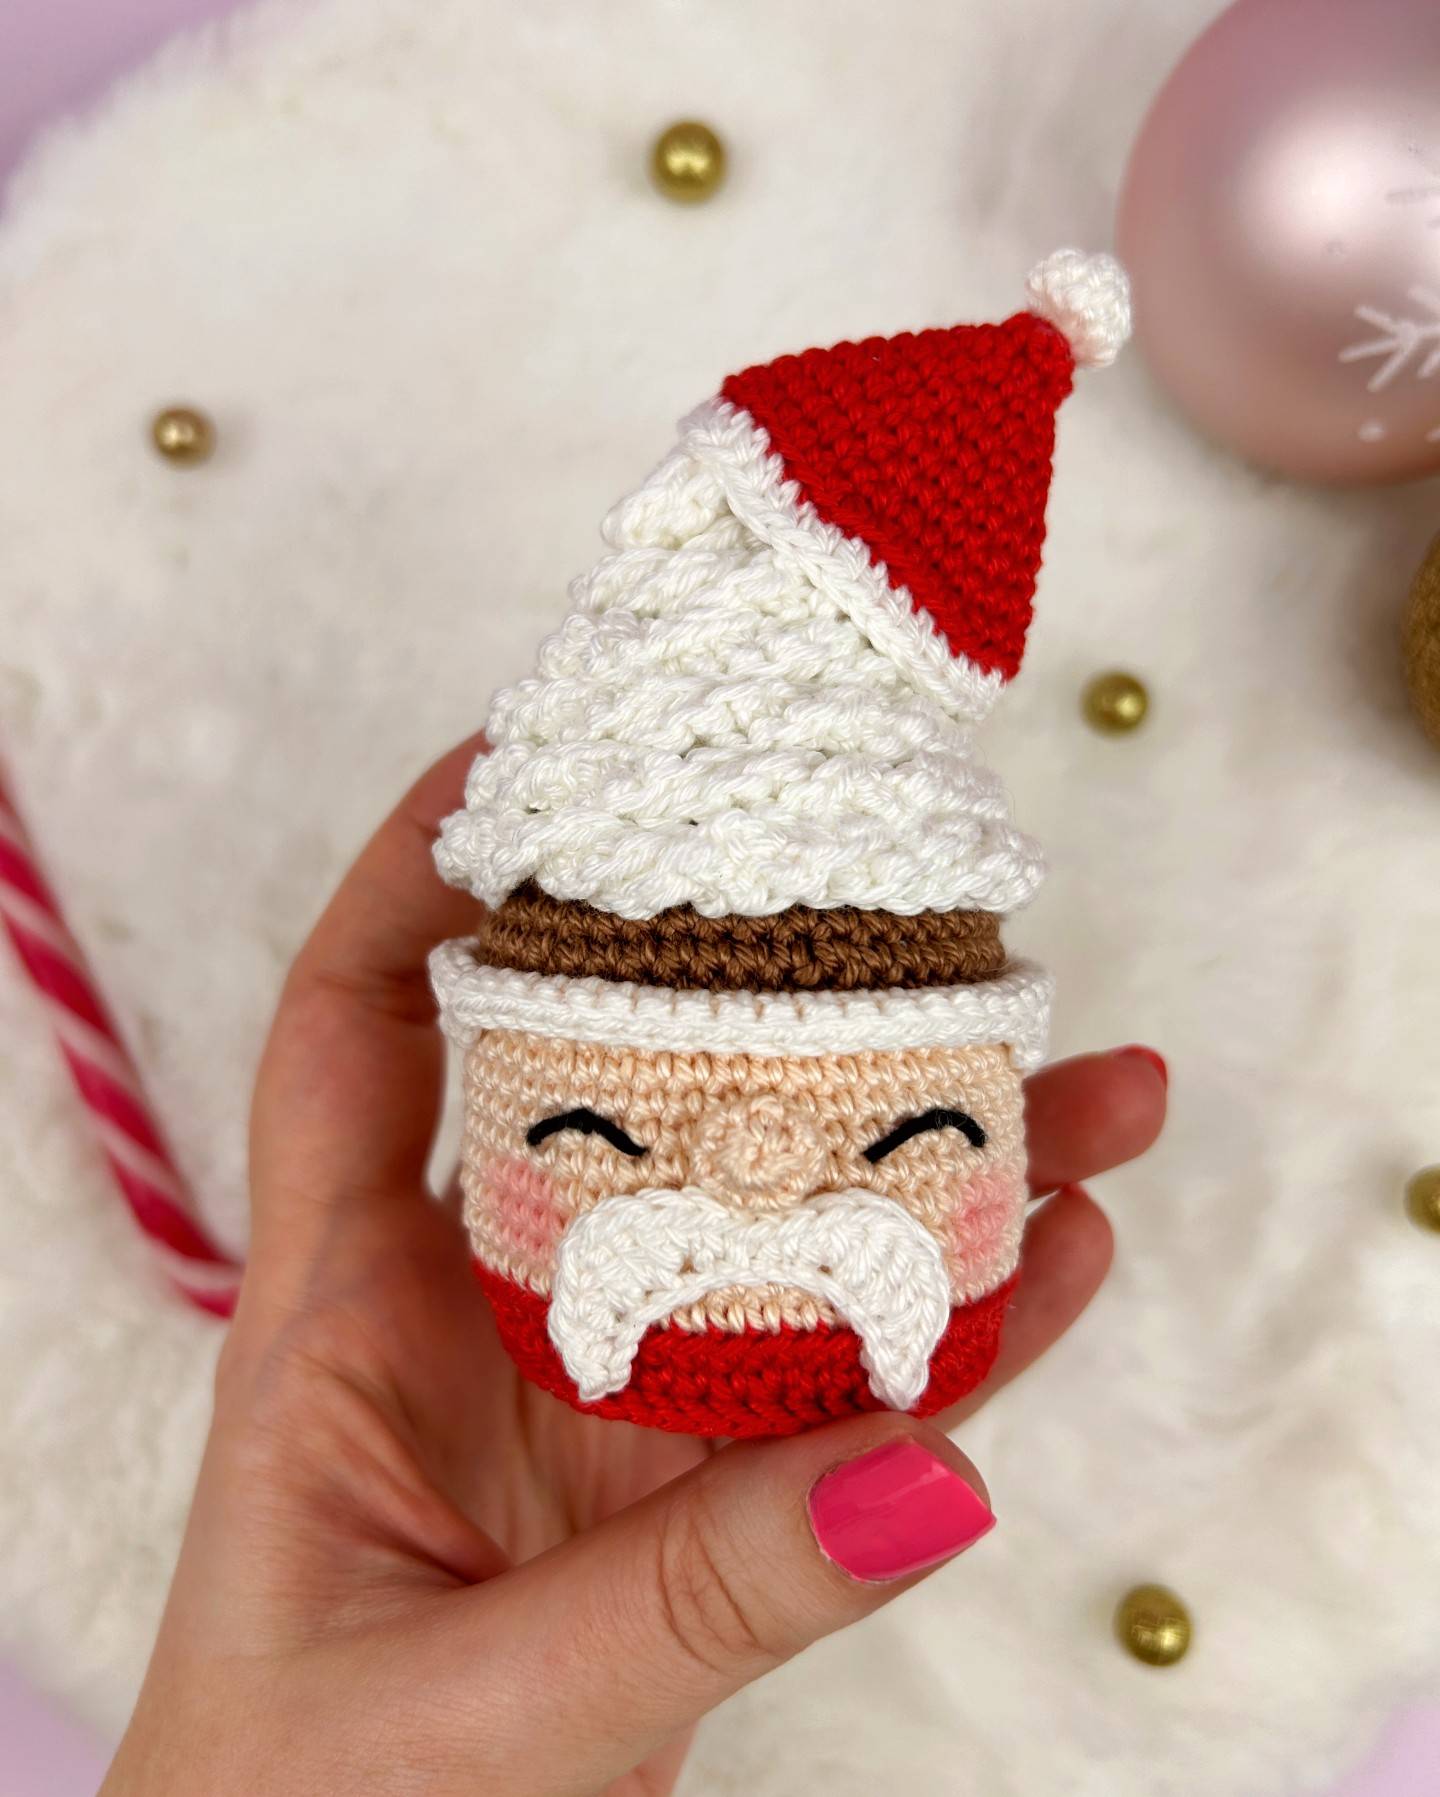
For this end of the year, I was invited to participate in a CAL for Christmas on Instagram by @adeline.juliette with @calenattendantnoel 🎄 It is with great pleasure that I have of course agreed to participate and create a small pattern to crochet for Christmas! That’s how the pattern of Santa Cupcake was born 🎅 A gourmet cupcake that will please everyone 😍
If you would like other patterns in the Christmas theme, others are available on my site!
I share this crochet pattern of the Santa Cupcake for free below and also in PDF format on my shop if you want to keep it with you!


🎅 Inspiration 🎅
I really like crocheting little treats (you’ll find plenty on my site!) and one in particular that I crocheted more than the others with Cupcakes 😍 I always like to create more new variants and I hadn’t made a Santa version yet.
If you also love cupcakes, you can find my other cupcake patterns on my site with the Christmas Cupcake, the Strawberry Cupcake, the Birthday Unicorn Cupcake and the Halloween Cupcakes.
My other inspiration is of course the end-of-year holidays with Christmas! I imagined this Santa Cupcake as an original decoration to place on the table, to hang in the tree or as a handmade last-minute gift. This Santa Cupcake will make a great effect for sure! 🥰
🎄Some technical details about the Santa Cupcake🎄
Among the advantages of this crochet pattern, it is very easy and quick to make whether you are a beginner or not. I have also well detailed each of the steps so that you succeed as easily as possible and especially without overthinking yourself!
For the colors, all combinations are possible. Crochet it in those you like the most or choose colors that match well with the theme of colors you have chosen for the holidays, more girly or in a more original way.
This crochet pattern for the Santa Cupcake will also allow you to learn the sharp edge technique that I use on quite a few of my patterns and which gives a superb result. I have also posted a video online to explain it in detail so that you can master it on the first try.
This pattern will also allow you to test a new way of creating a crocheted chantilly that is mega simple and I love the way it looks! 🤩
This pattern is suitable for crocheters with a beginner difficulty.
Find this pattern just below 🔽

🎄 Material you need 🎄
If you want to use the same material as mine, I am attaching few links below.
These are affiliate links on Amazon. As an Amazon Associate I earn from qualifying purchases.
- Crochet 2 or a crochet hook suitable for your yarn
- Cotton yarns (fingering) : Red (Color A) -> about 20g
White (Color B) -> about 30g
Beige (Color C) -> about 20g
Brown (Color D) -> about 20g
Black (Color E) -> about 2g - Yarn needle
- Stitch marker
- Scissors
- Stuffing
- Some cardboard
- Pink blush
🧁 Abbreviations used 🧁
R : Row
sc : Single crochet
Inc : Increase
Dec : Decrease
CH : Chain
SlSt : Slip stitch
hdc : Half double crochet
dc : Double crochet
tr : Treble
*…* : Repeat around the row
[…] : In the same stitch
Find more magic patterns ✨


🎅 The pattern in PDF format 🎅
If you prefer to have the printable PDF file of this pattern, you can find it by clicking on the image below 🔽
🎁 Written explanations 🎁
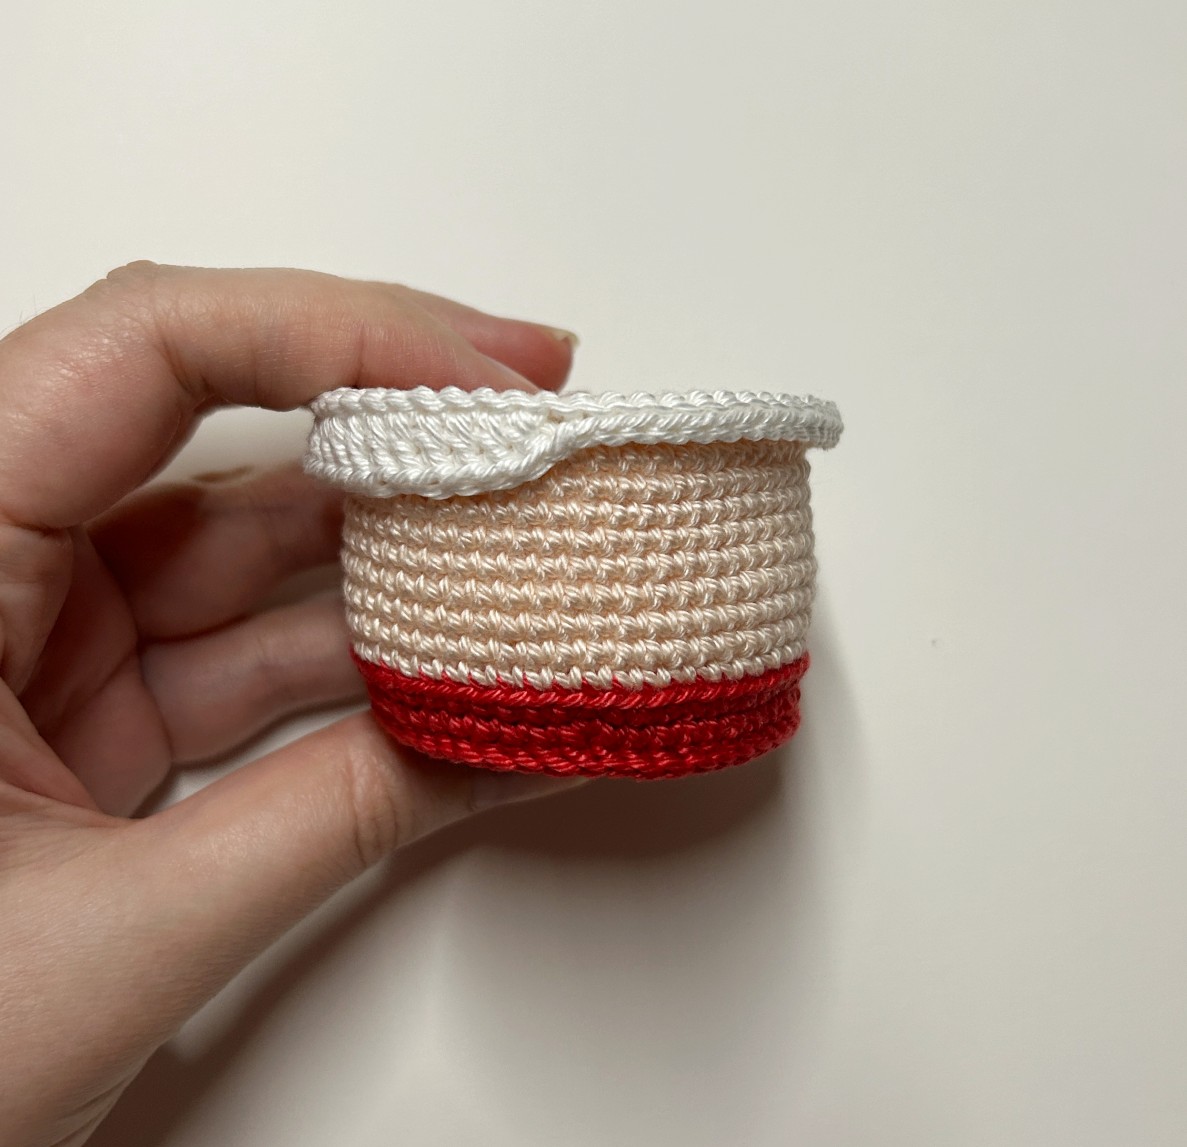
🎅 The cup
(to be done with Color A, Color B and Color C)
In red (Color A)
R1: magic ring with 6 sc
R2: 1 Inc in each sc (12)
R3: *1 sc, 1 Inc* x6 (18)
R4: 1 sc, 1 Inc, *2 sc, 1 Inc* x5, 1 sc (24)
R5: *3 sc, 1 Inc* x6 (30)
R6: 2 sc, 1 Inc, *4 sc, 1 Inc* x5, 2 sc (36)
R7: *5 sc, 1 Inc* x6 (42)
R8: 3 sc, 1 Inc, *6 sc, 1 Inc* x5, 3 sc (48)
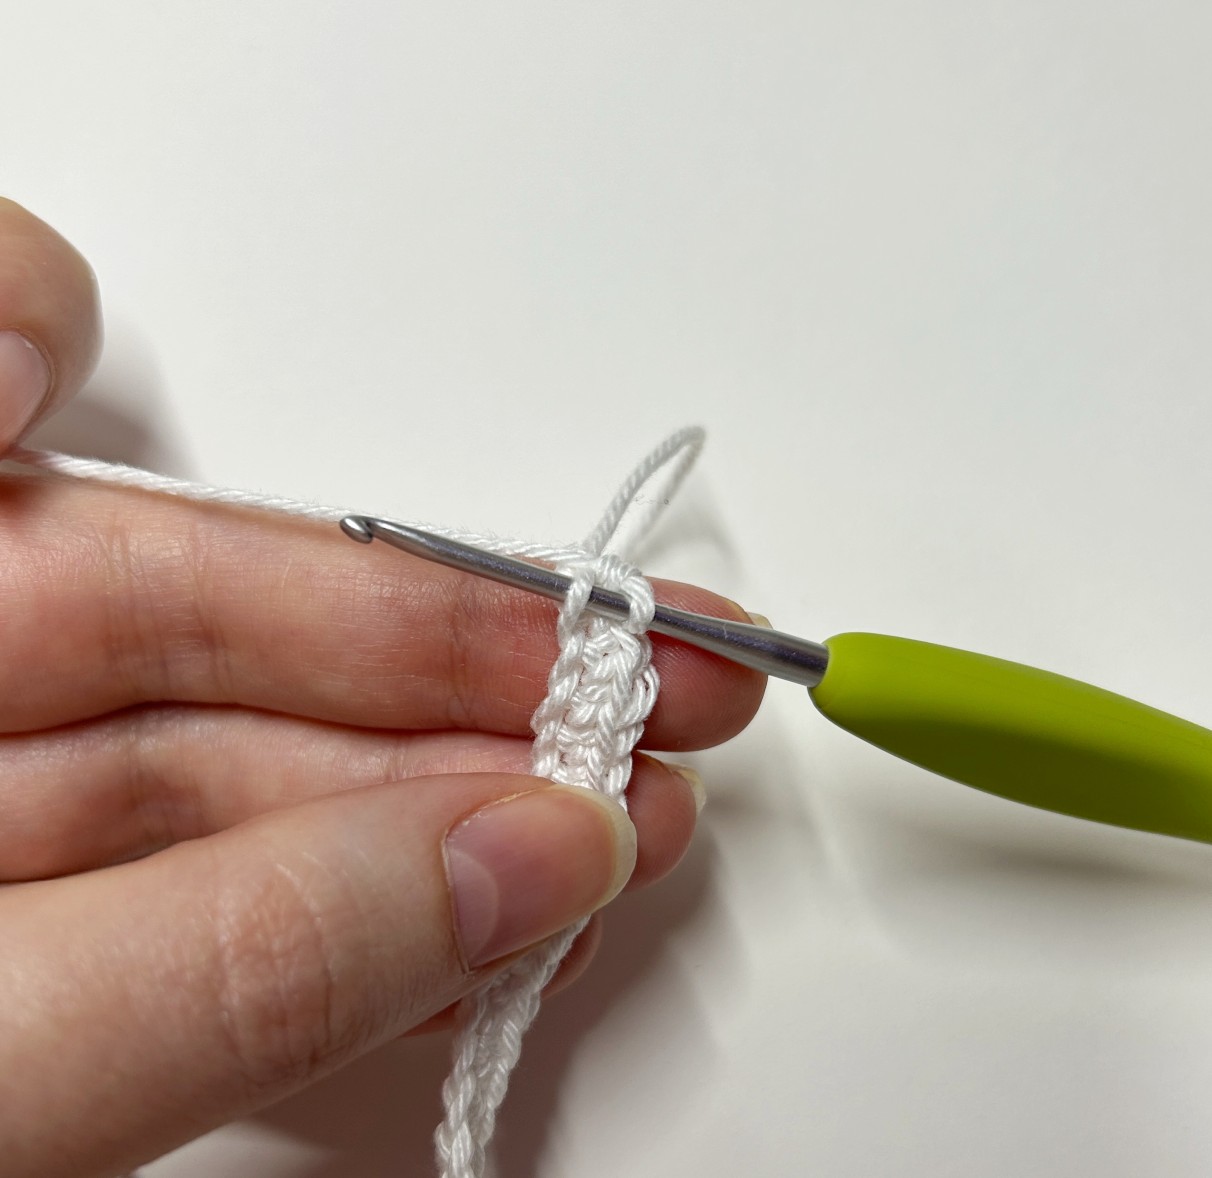
R9: With the stitch to rise the edge (see explanations video), sc in each sc (48)
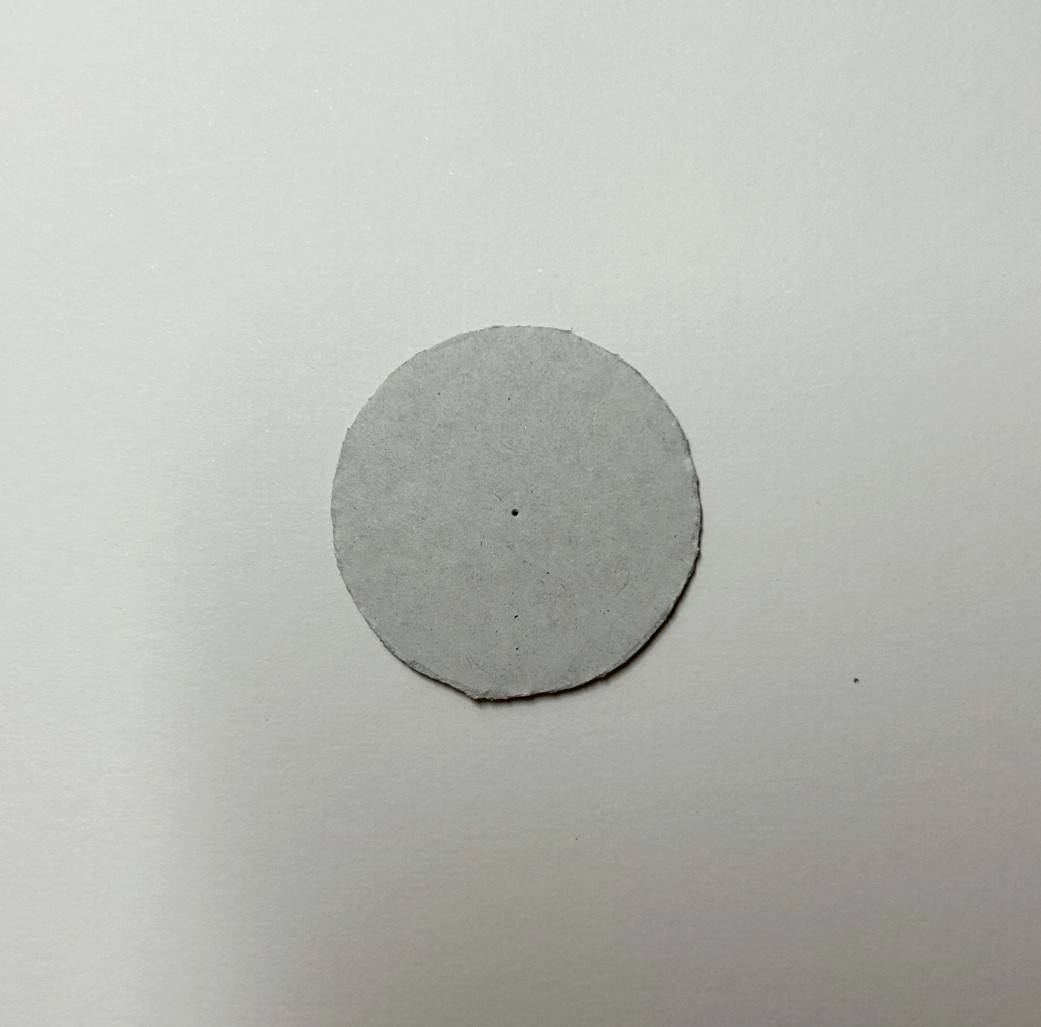
-> For a flat bottom, I advise to add cardboard but it is optional.
-> For this, add cardboard of a size equal to the
diameter of your work.
-> You can use a compass and take the circumference of the bottom of the cup to transfer it on the cardboard or put the bottom on the cardboard directly to go around it.
-> Then stick it on the bottom of your cup.
R10: *7 sc, 1 Inc* x6 (54)
R11: sc in each sc (54)
Fasten off and make an invisible finish (see explanations video).


All rights reserved. You can not resell, share, modify or publish this pattern.
This pattern is for PERSONAL use only. The pattern may not be, in whole or in part, reproduced, published (online or printed), modified or resold according to article L.122-4 of the french intellectual property code.
You can sell the finished products, if they are made by you, in limited quantities and by providing the name of the designer. Please add the following information to the description of the amigurumi sold:”This plush/accessory was handmade by … (your name) from a pattern created by My Rainbow Crochet”
Copyright 2025 MyRainbowCrochet
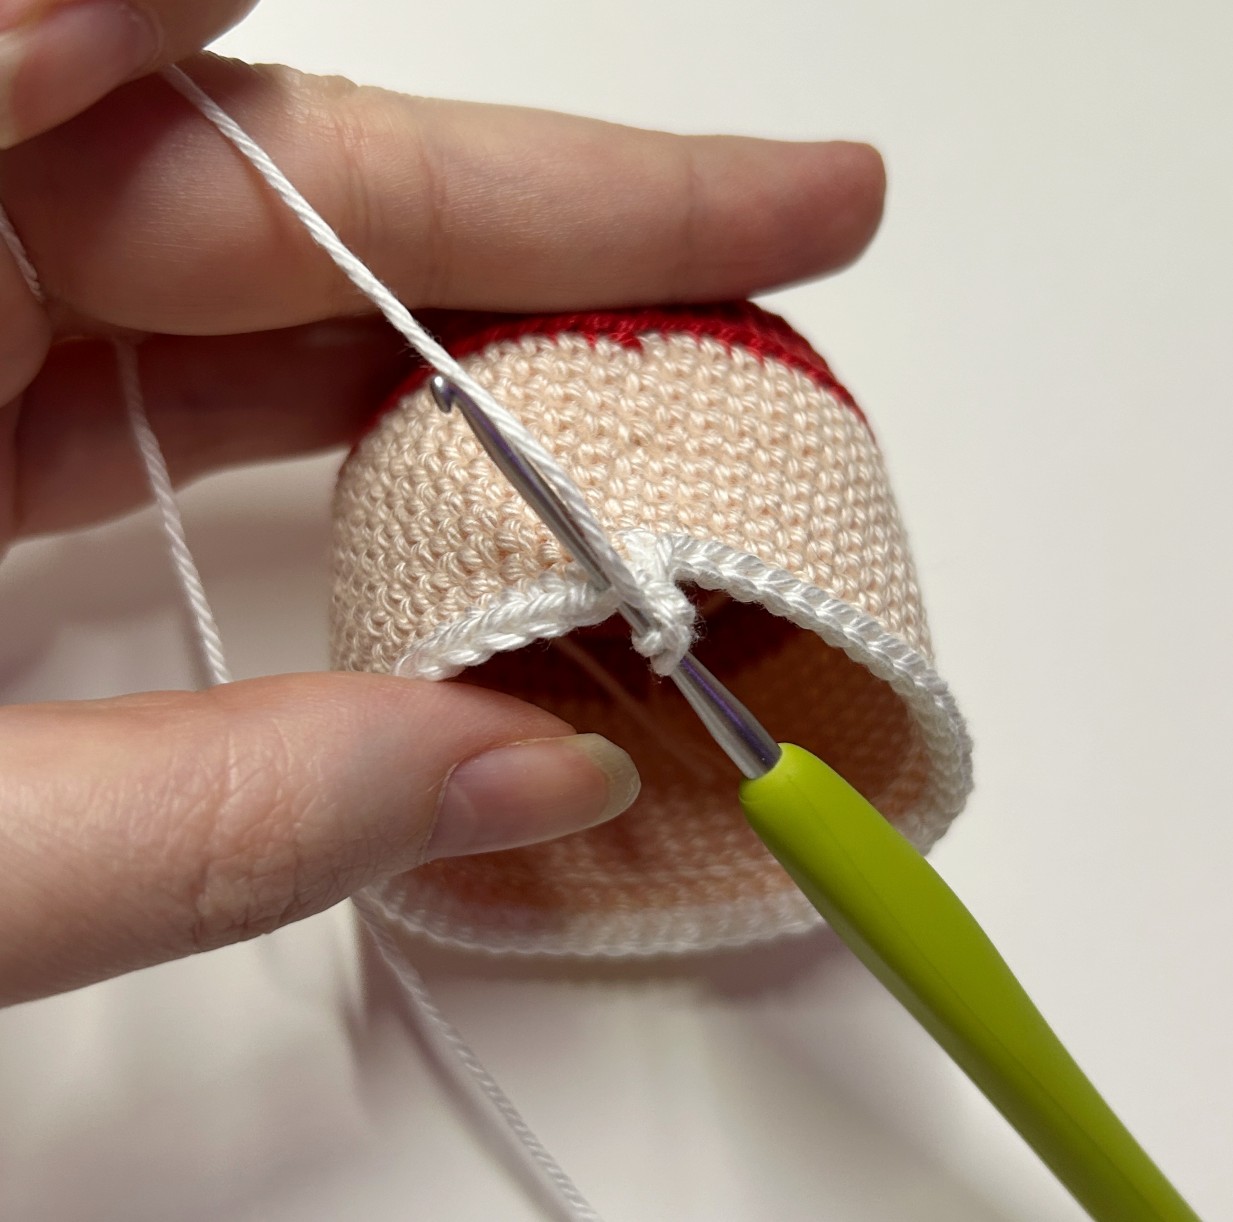
In beige (Color C)
R12: only in back loops, make 1 sc where we
left off then sc in each sc (54)
R13 to R20: sc in each sc (54) (8 rows)
R21: only in front loops, sc in each sc (54)
Fasten off and make an invisible finish
In white (Colo B)
R22: make 1 sc where we left off then sc in
each sc. Finish with 1 SlSt in the 1st stitch
of the row (54)
Keep the thread to continue with the hair below.

🧁 Hair
(to be done with Color B)
CH 3 then return the hook to reach the
last stitch of the previous row.
Only in the back loop, make 1 dc in this
stitch. Then continue with 16 dc, 19 SlSt,
18 dc. Finish with 1 SlSt in the 1st dc of
the row.
Fasten off and weave in ends.
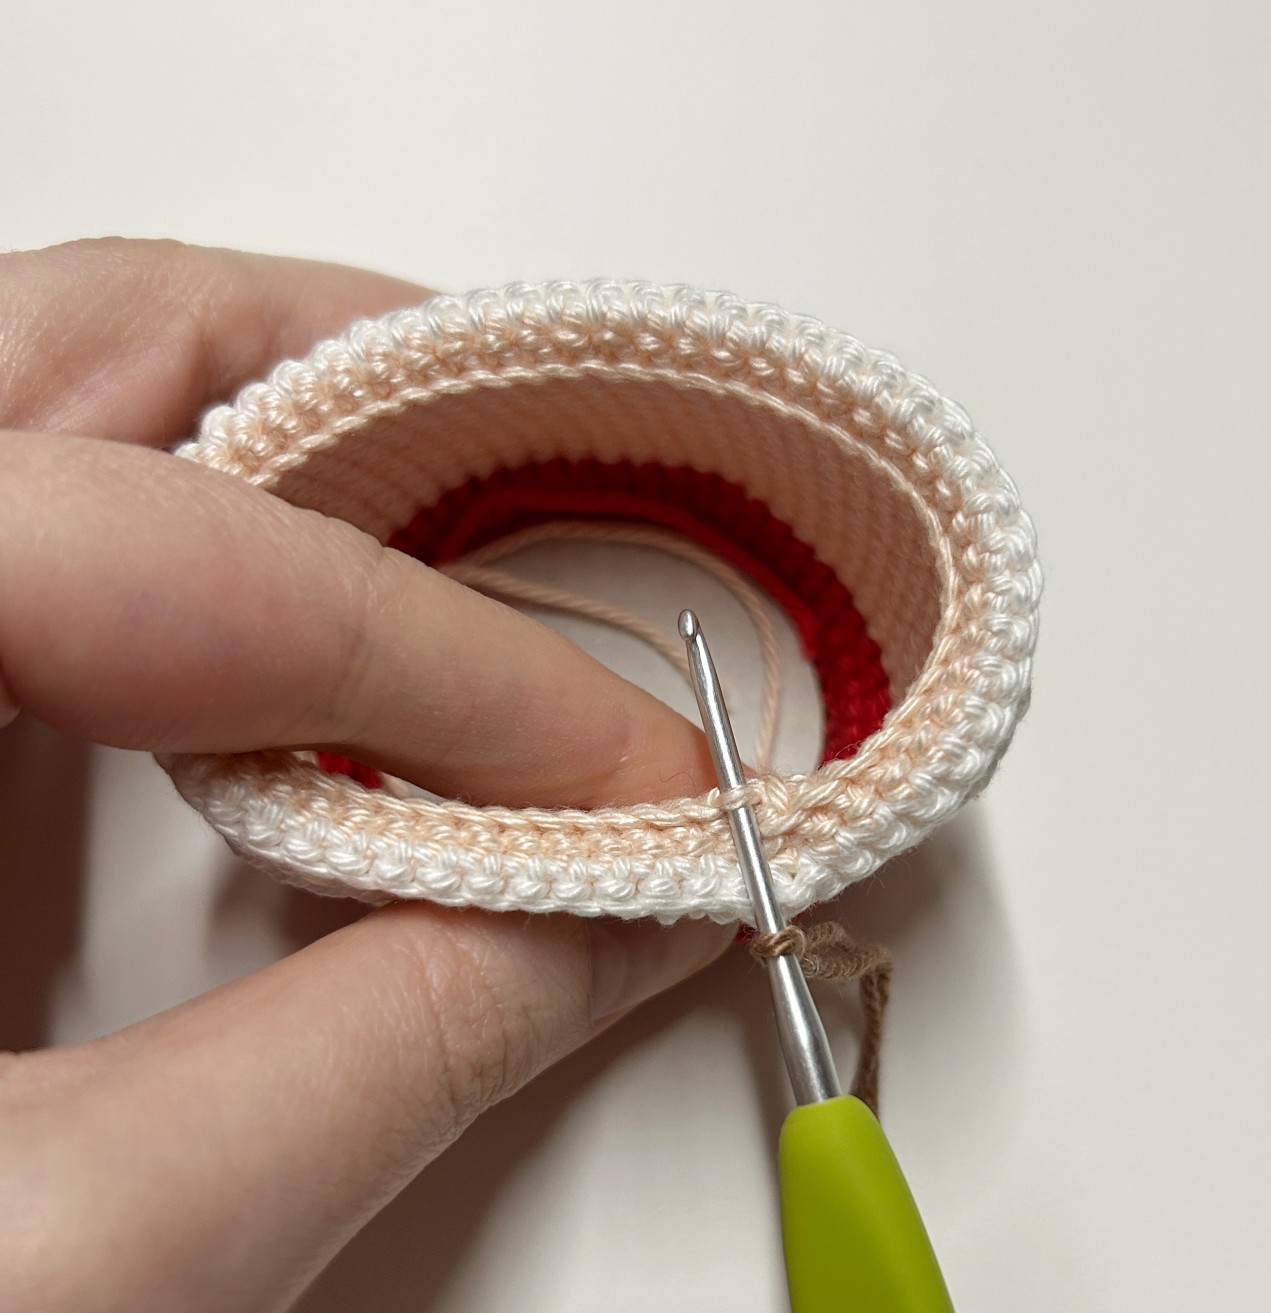
🎄 The cake
(to be done with Color D)
→ We will resume in the back loops of the R21 from the cup that we had left.
R1: make 1 sc in back loops of R21 then sc in
each sc (54)
R2: *7 sc, 1 dec* x6 (48)
R3: sc in each sc (48)
R4: *6 sc, 1 dec* x6 (42)
R5: sc in each sc (42)
R6: *5 sc, 1 dec* x6 (36)
R7: sc in each sc (36)
R8: *4 sc, 1 dec* x6 (30)
R9 and R10: sc in each sc (30) (2 rows)
R11: *3 sc, 1 dec* x6 (24)
R12 and R13: sc in each sc (24) (2 rows)
R14: *2 sc, 1 dec* x6 (18)
R15: *1 sc, 1 dec* x6 (12)
R16: 6 decreases (6)
R17: Fasten off and insert thread into the front
loops of the remaining 6 stitches. Tighten to close the hole.
Weave in ends.
Find more magic patterns ✨


🎅 The mustache
(to be done with Color B)
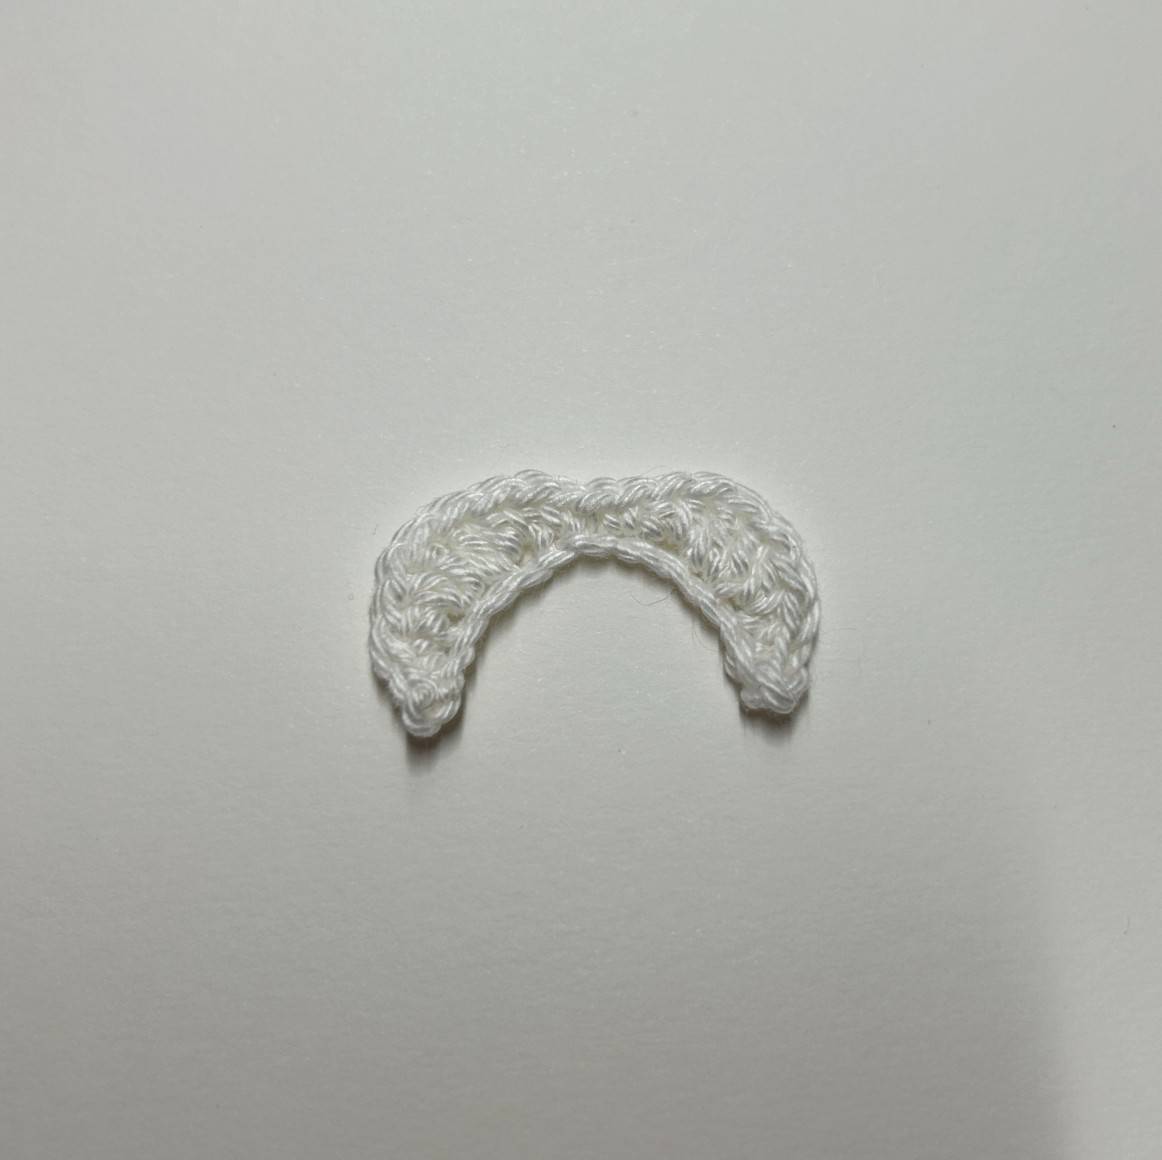
R1: CH 14
R2: from the 2nd CH, 1 SlSt, 1 sc, [2 hdc], [2
dc], [2 hdc], 1 sc, 1 SlSt, 1 sc, [2 hdc], [2 dc], [2
hdc], 1 sc, 1 SlSt
Weave in ends.
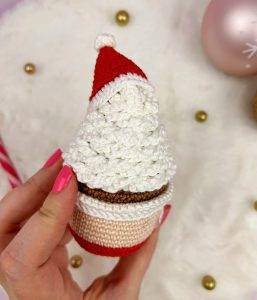
🧁 Cream
(to be done with Color B)
R1: cast on CH 250
R2: from 2nd CH, make 249 sc.
R3: Turn the chain over and start this
3rd row in the loops of the 1st row as
in the photo working sc in each sc
(249).
This result is obtained at the end of
the 3rd row.
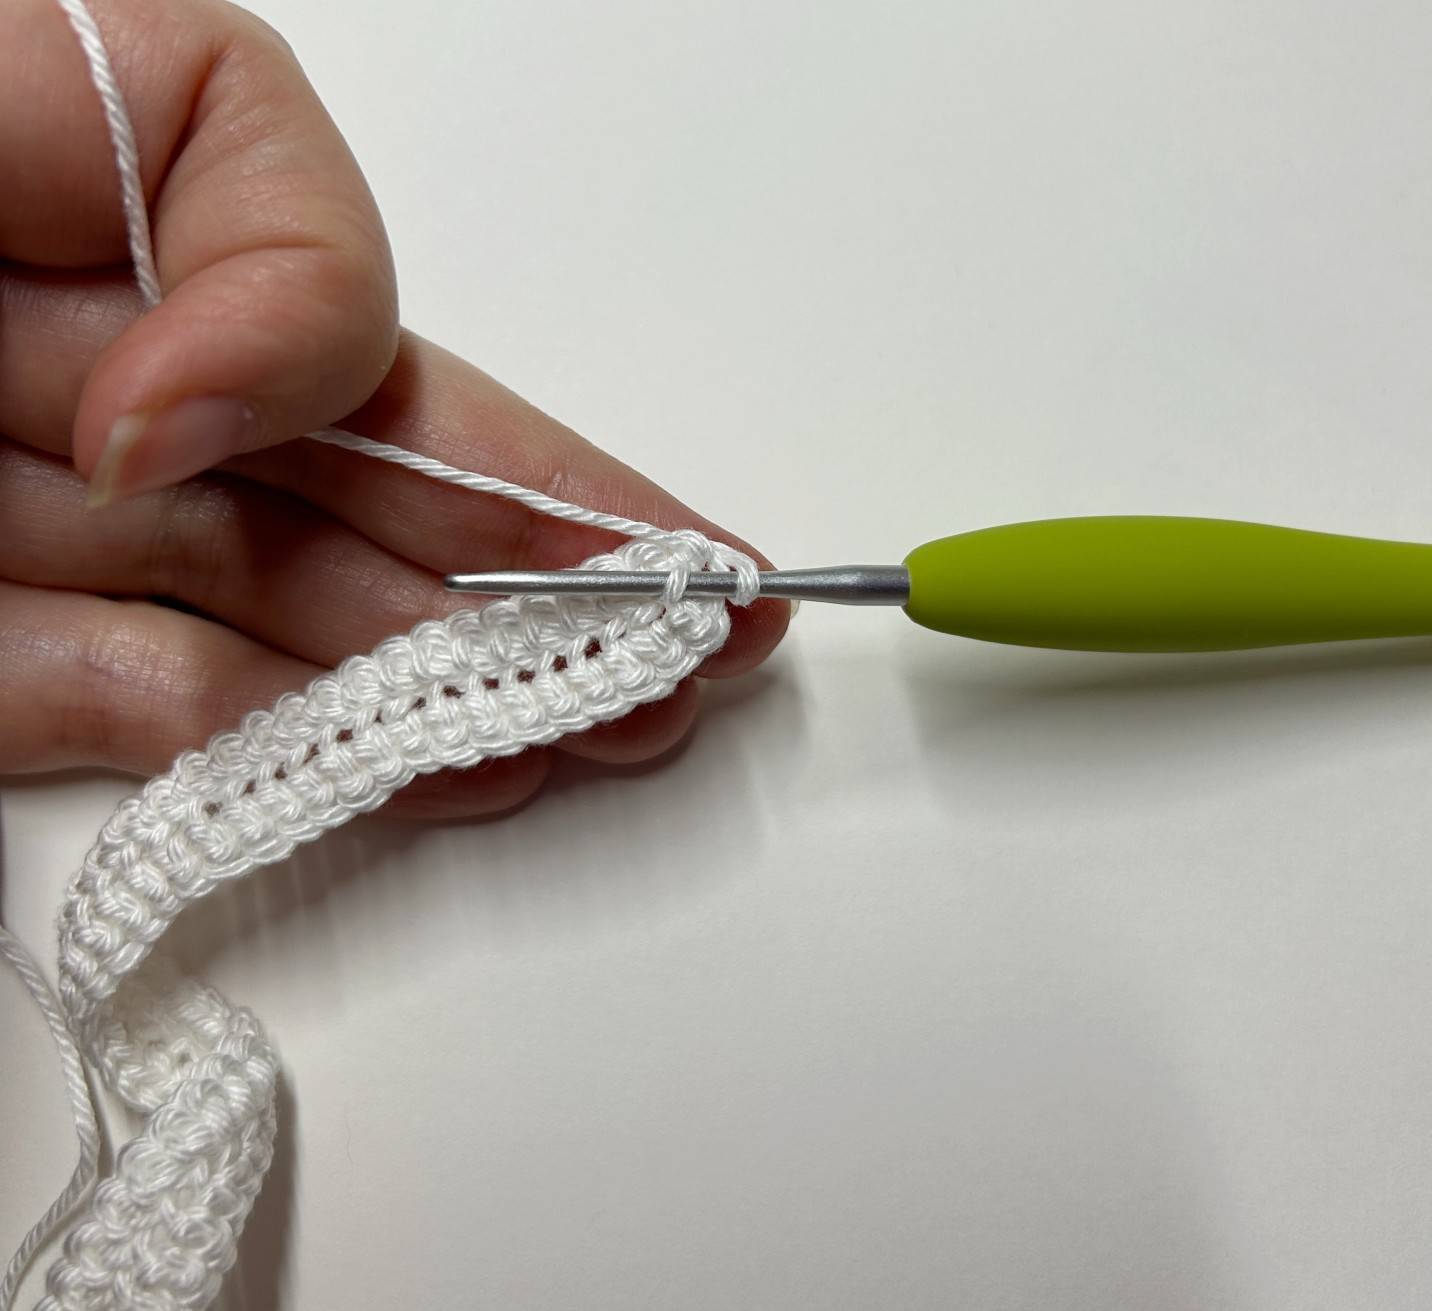
Turn your work over to look for the 3rd original loop of your 1st row chain which must be in the middle as in the photo (i.e. the loops of the
basic chain).
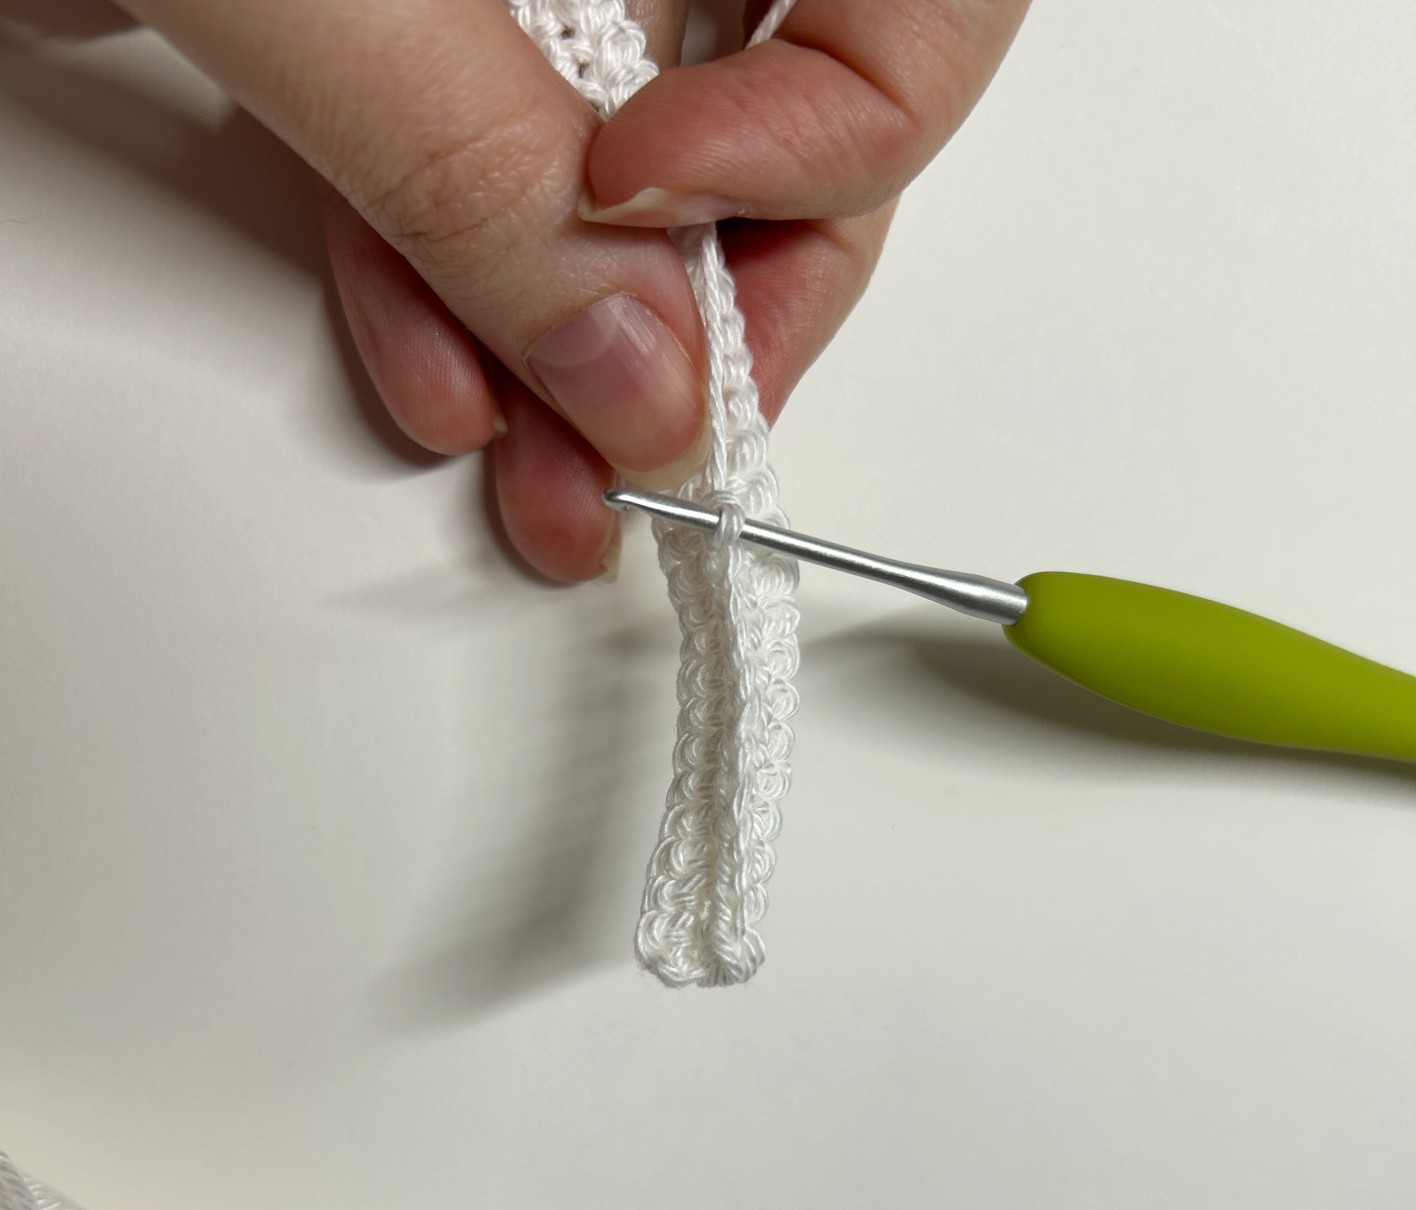
And make single crochet in each
loop (249).
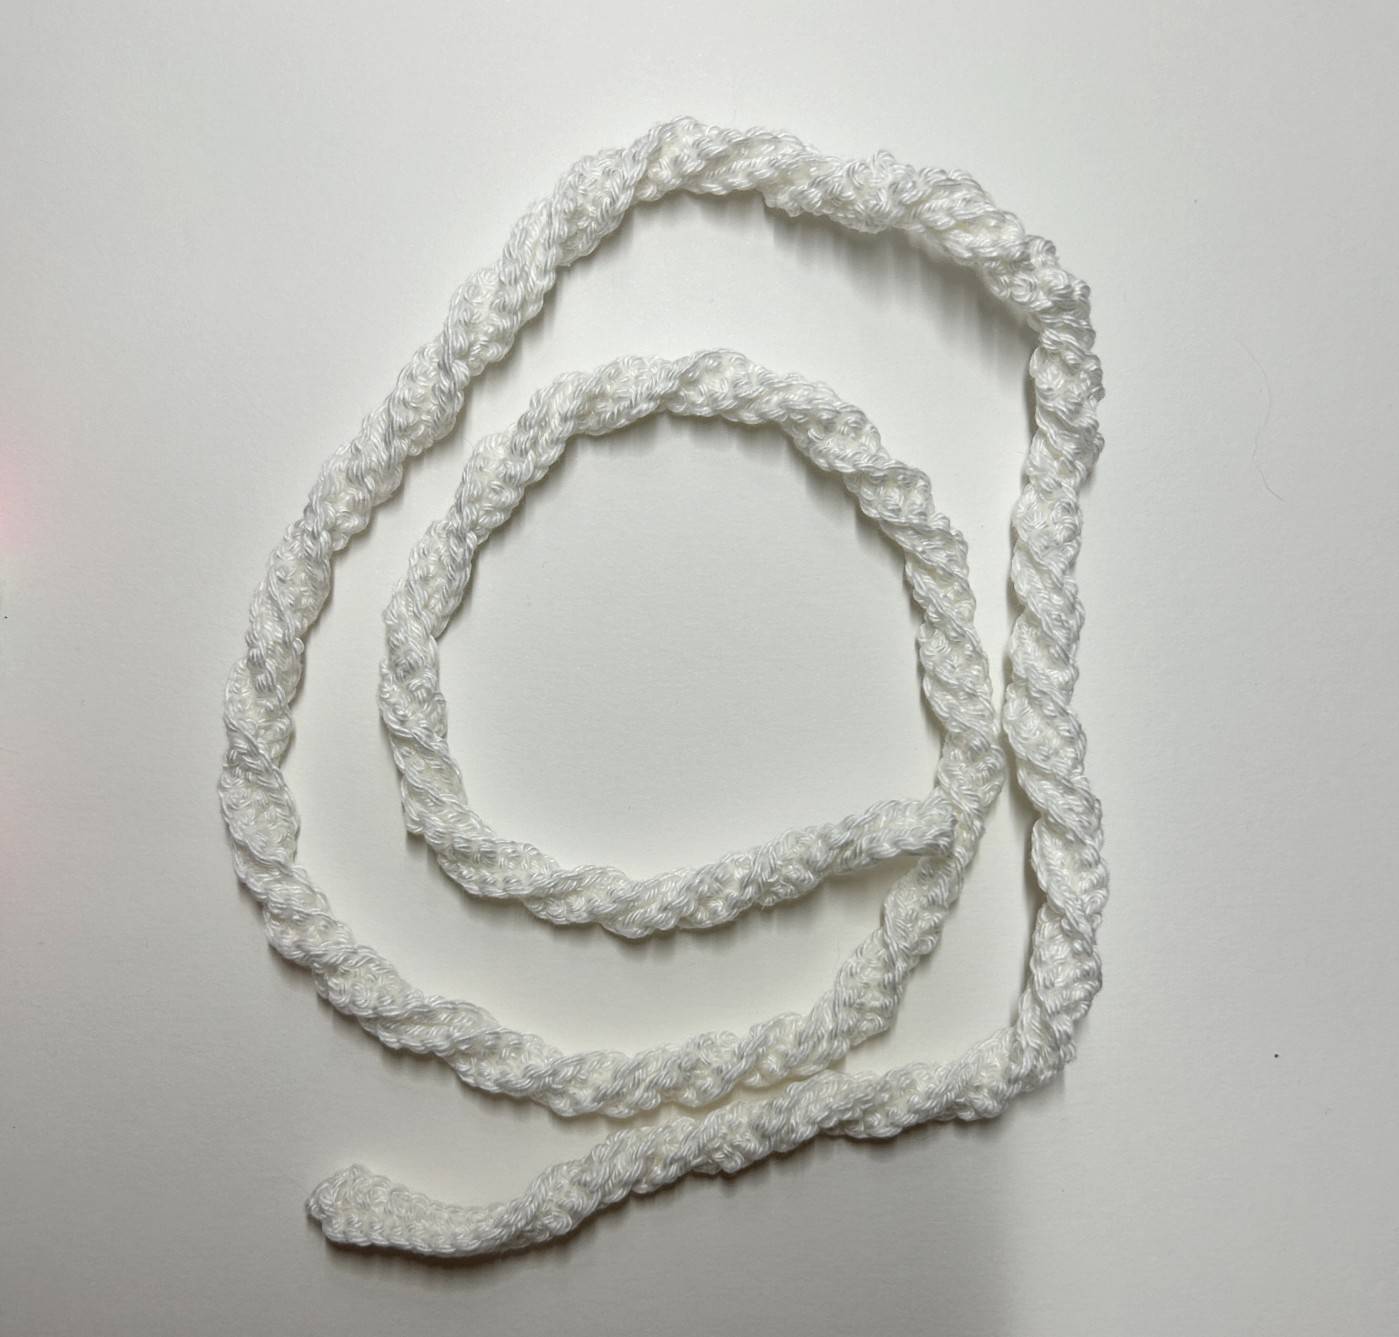
Twist slightly as in the photo to give
it the relief and volume of whipped
cream.
✨ Receive your Magic e-book with 5 free patterns! ✨
🎄 The beanie
(to be done with Color A and Color B)
In red (Color A)
R1: magic ring with 6 sc
R2: sc in each sc (6)
R3: 1 Inc in each sc (12)
R4: sc in each sc (12)
R5: *1 sc, 1 Inc* x6 (18)
R6: sc in each sc (18)
R7: *2 sc, 1 Inc* x6 (24)
R8: sc in each sc (24)
R9: *3 sc, 1 Inc* x6 (30)
R10: sc in each sc (30)
R11: *4 sc, 1 Inc* x6 (36)
Fasten off and make an invisible finish.
In white (Color B)
R12: only in the back loops, CH 2, 1 hdc in the
same stich where we make CH. Then 1 hdc
in each sc. Finish with 1 SlSt in the 1st hdc.
Fasten off and weave in ends.
Beanie pompom in white (Color B):
R1: magic ring with 5 sc
R2: 1 Inc in each sc (10)
R3: sc in each sc (10)
R4: fasten off and insert thread into the
front loops of the remaining 10 stitches. Tighten to close the hole.
Weave in ends.
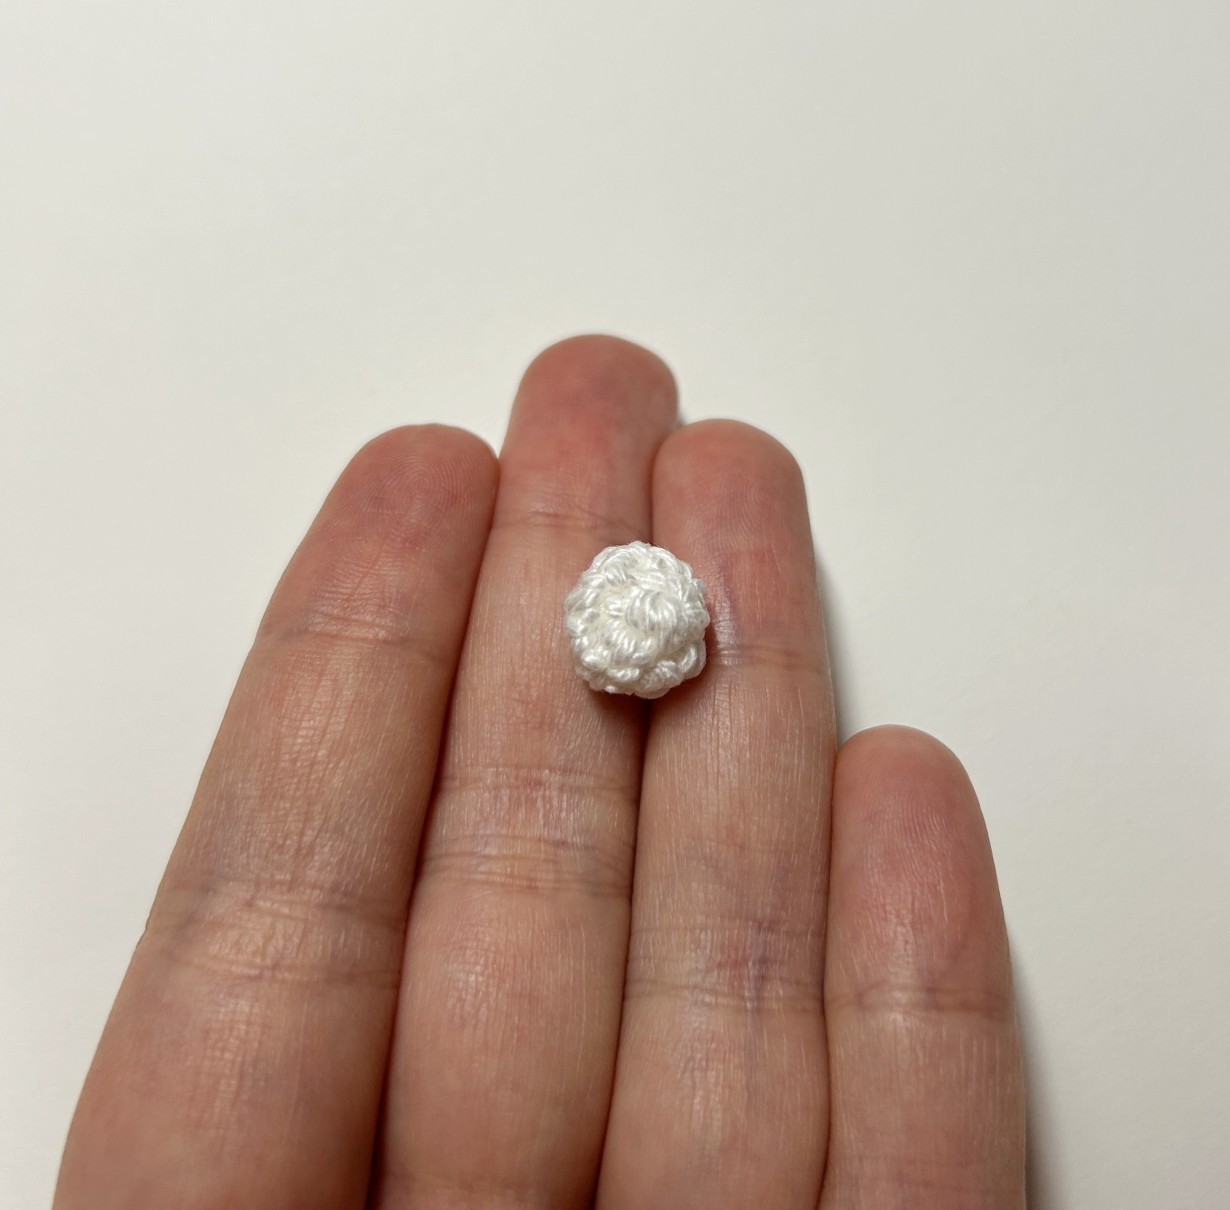
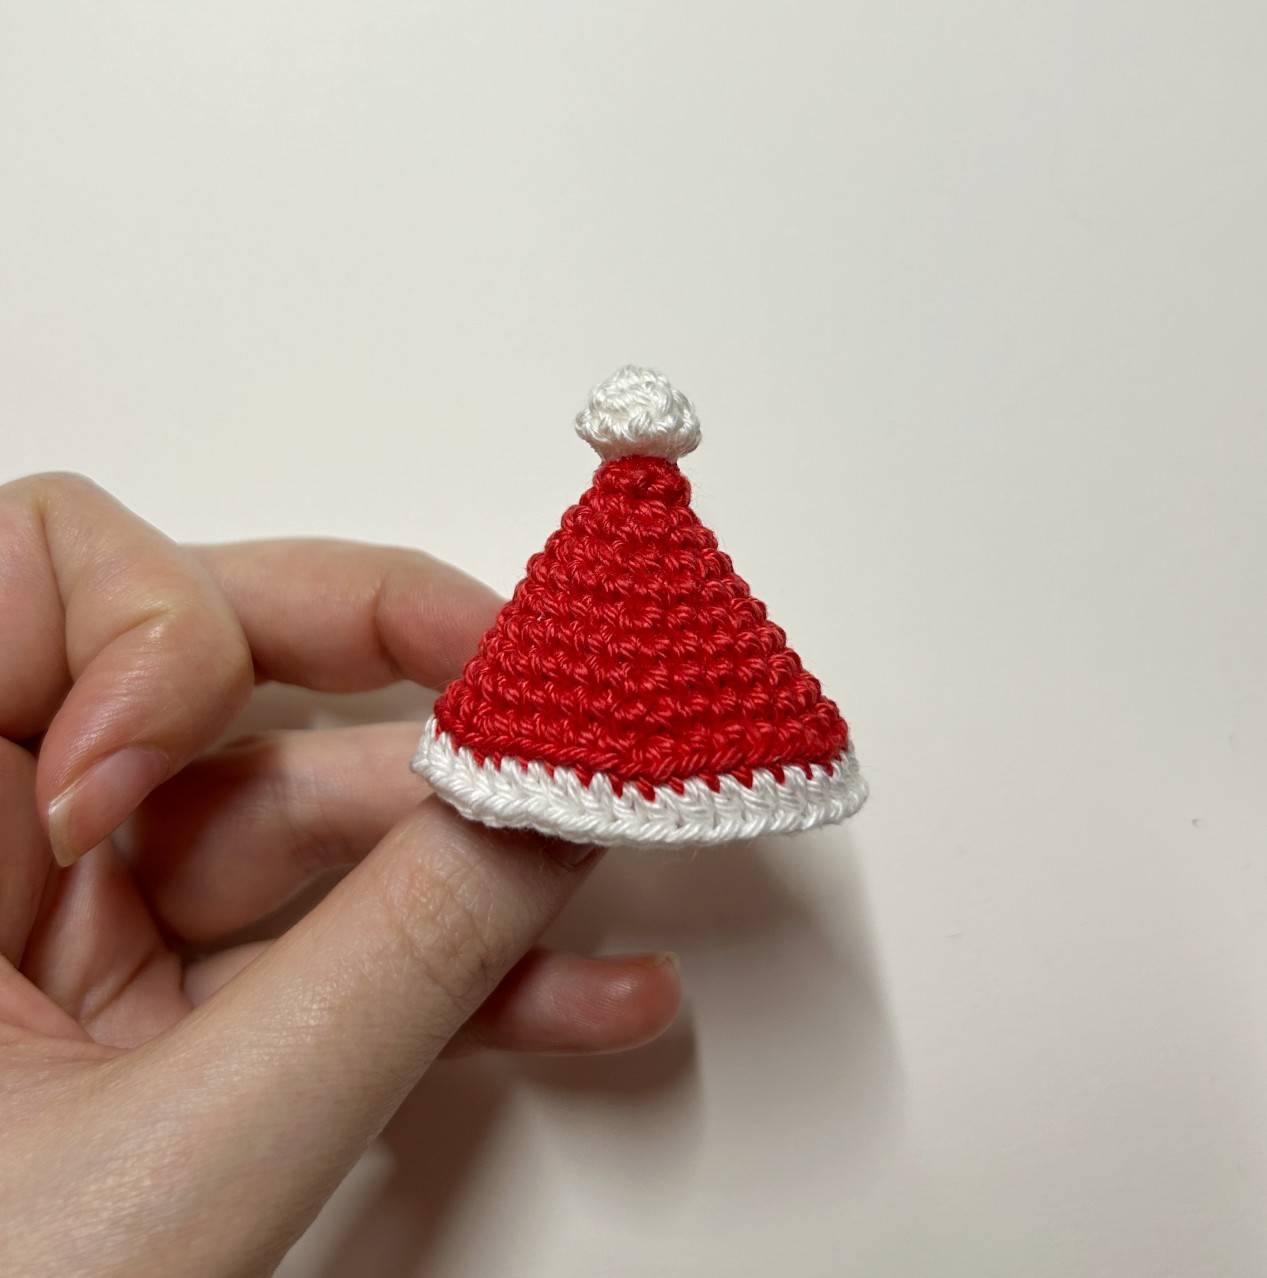
Stick the pompom to the top of the beanie.
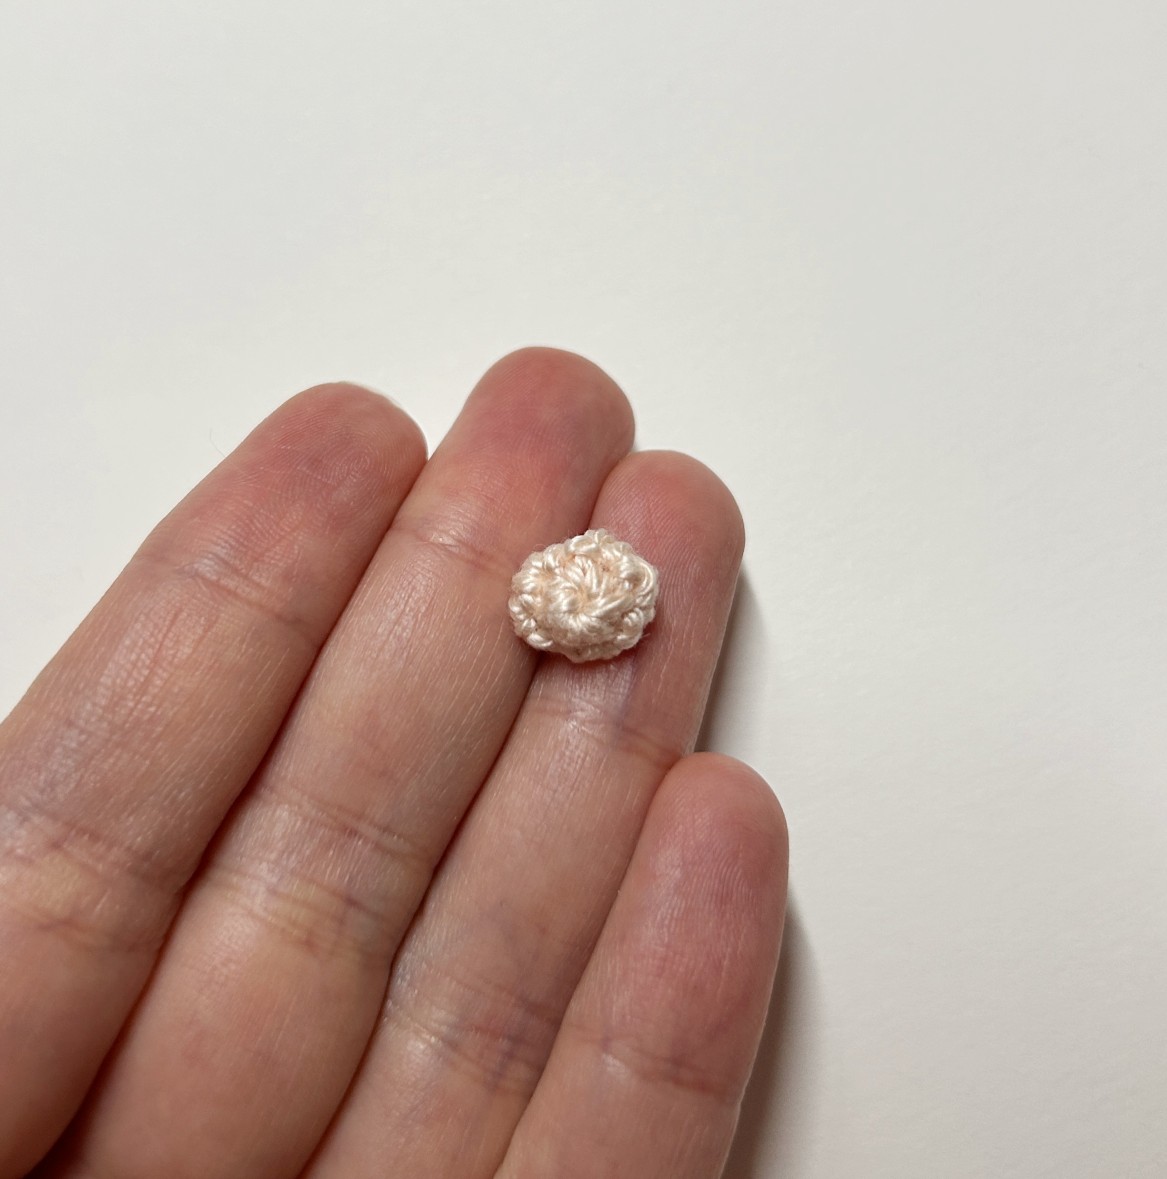
🎅 The nose
(to be done with Color C)
R1: magic ring with 6 sc
R2: *1 Inc, 1 sc* x3 (9)
R3: fasten off and insert thread into the
front loops of the remaining 9 stitches.
Tighten to close the hole.
🎅 Assembly and finishes 🎅
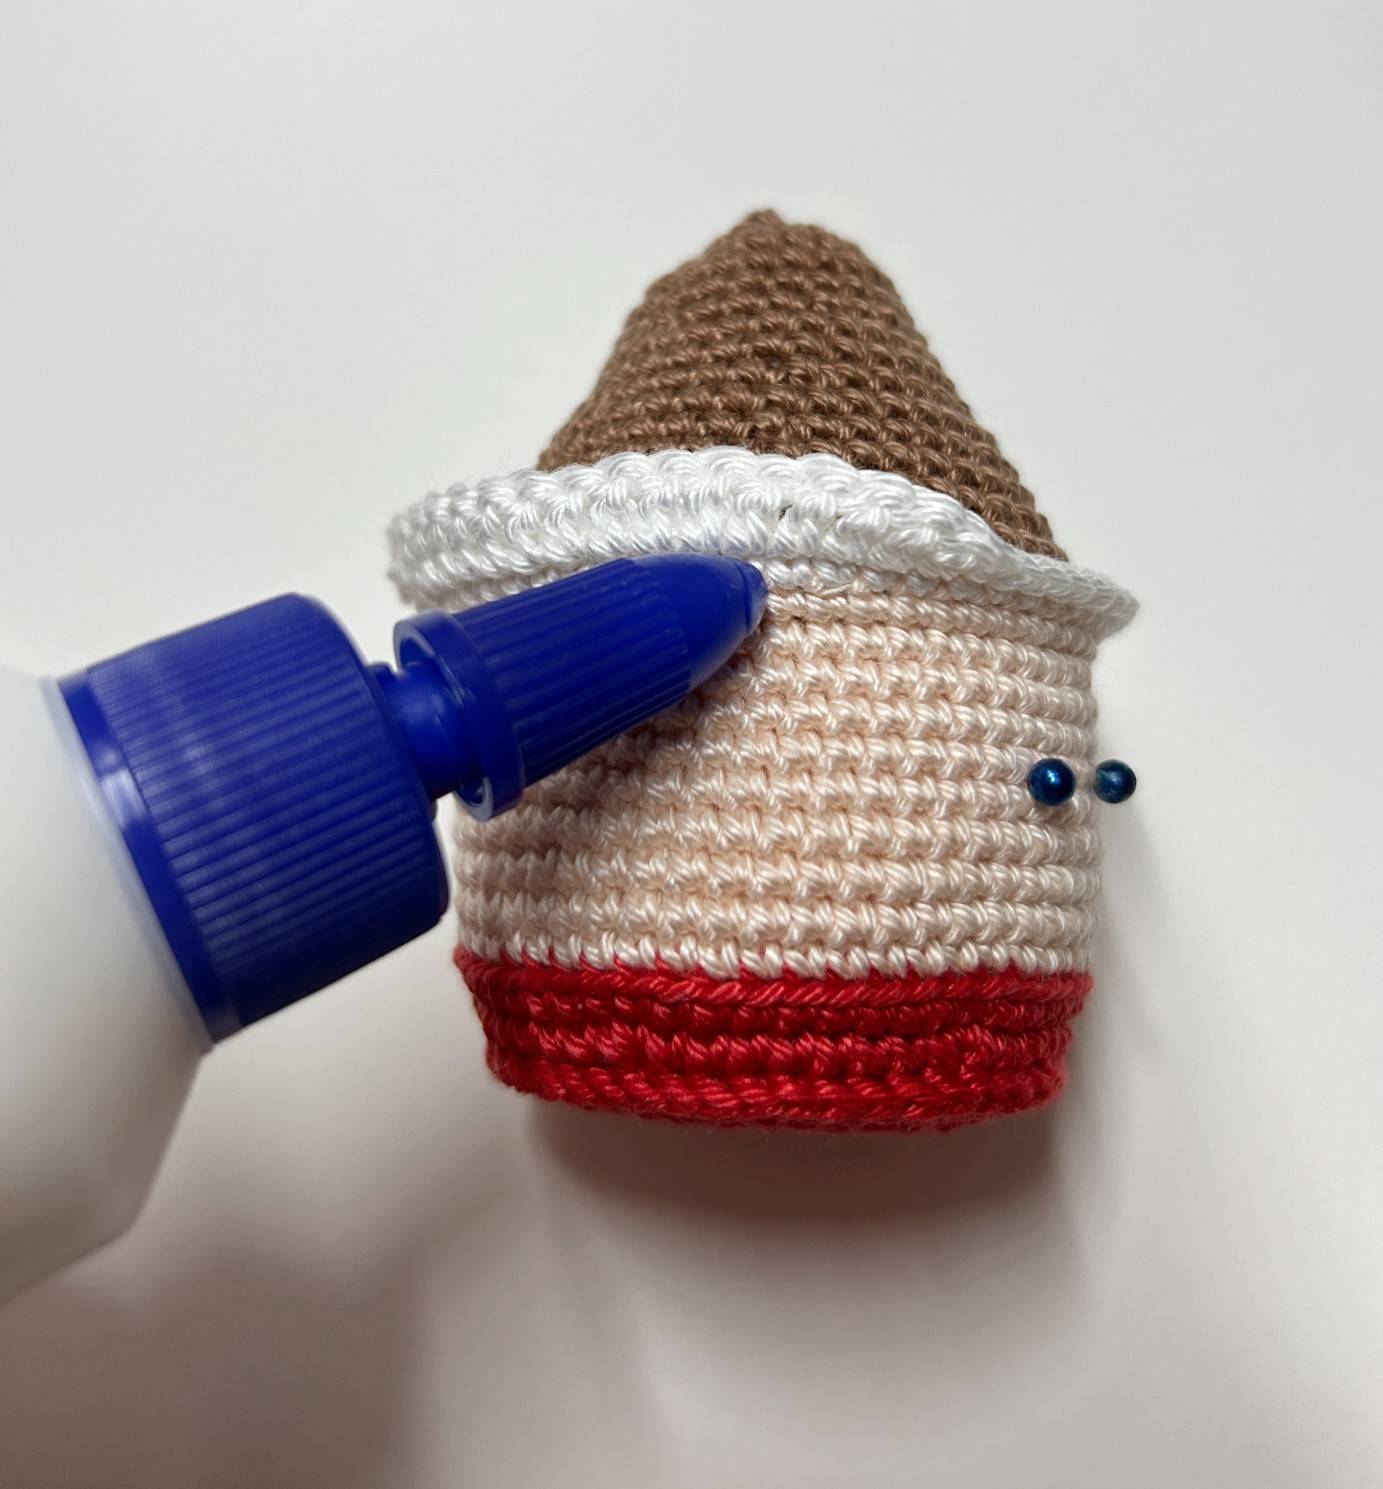

Glue the hair border on the cup, making sure to keep the relief of it with the cake at
the back.
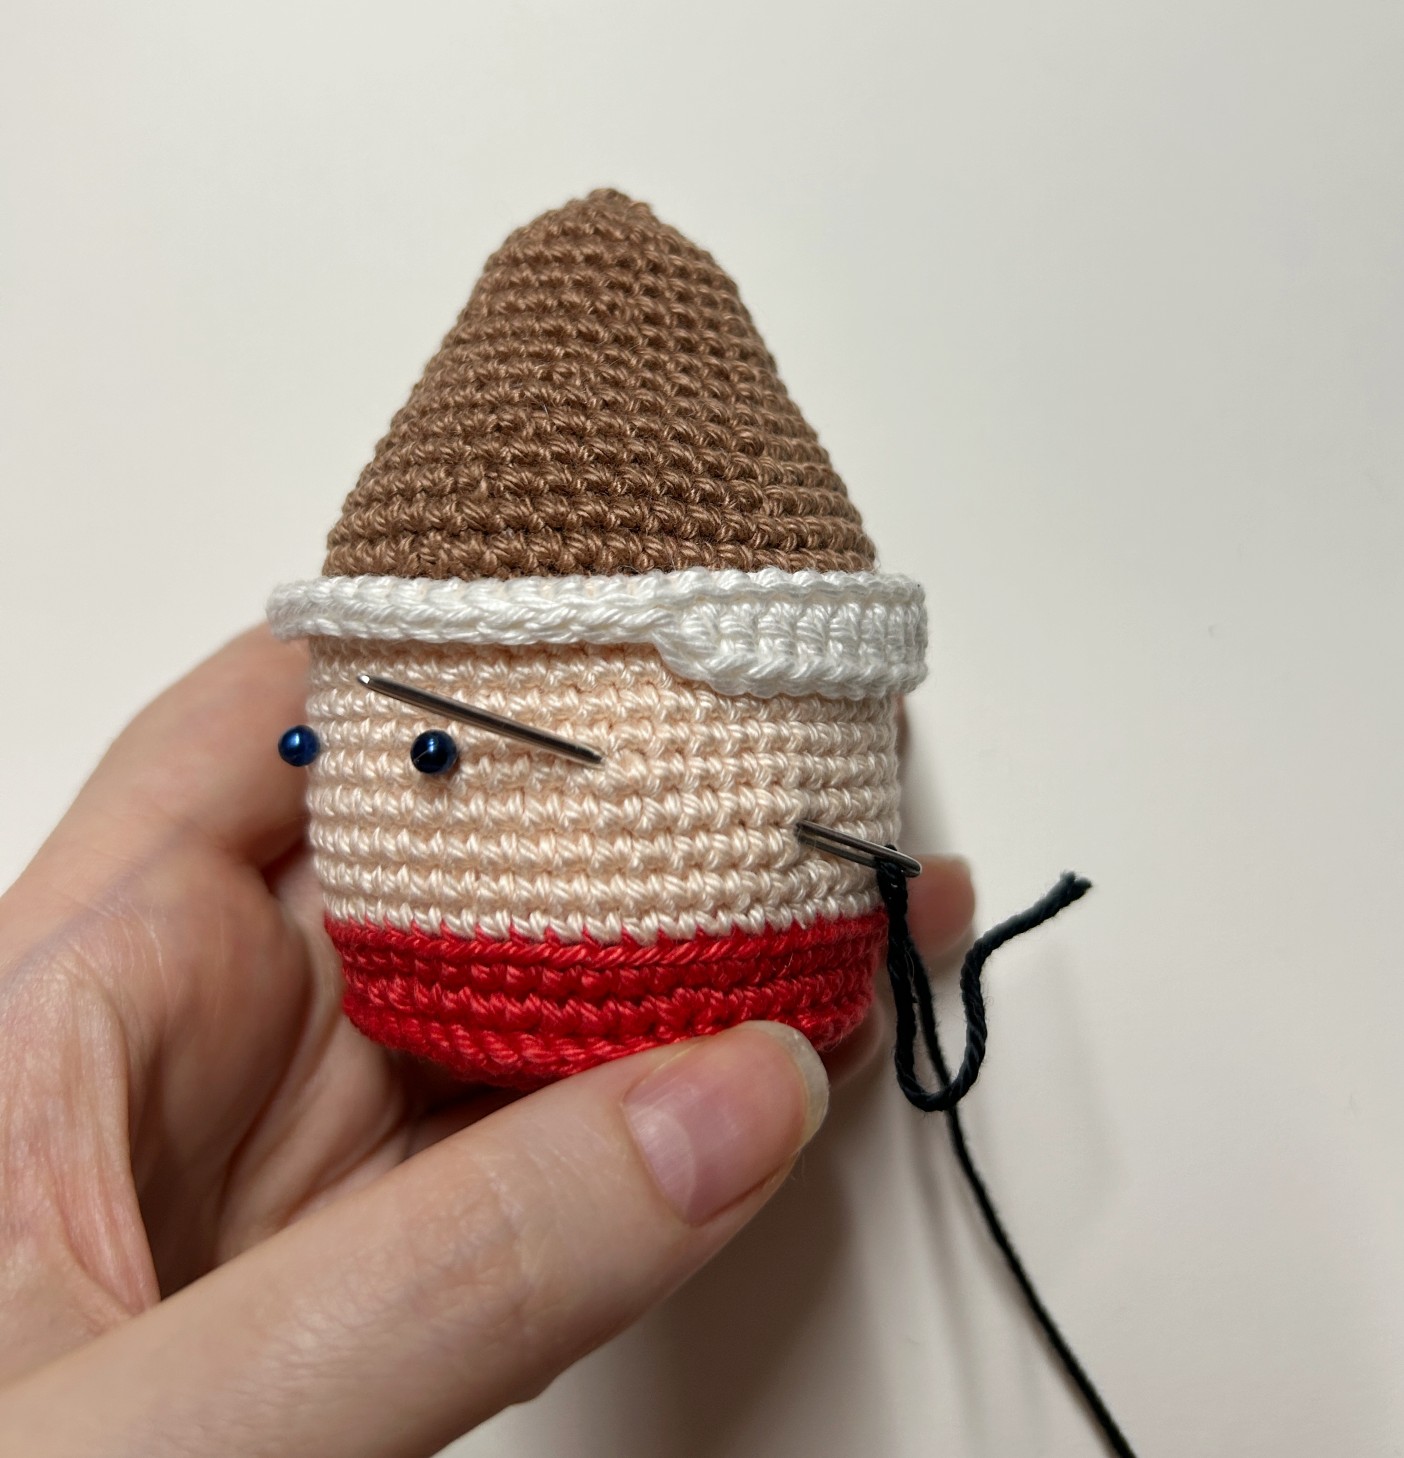
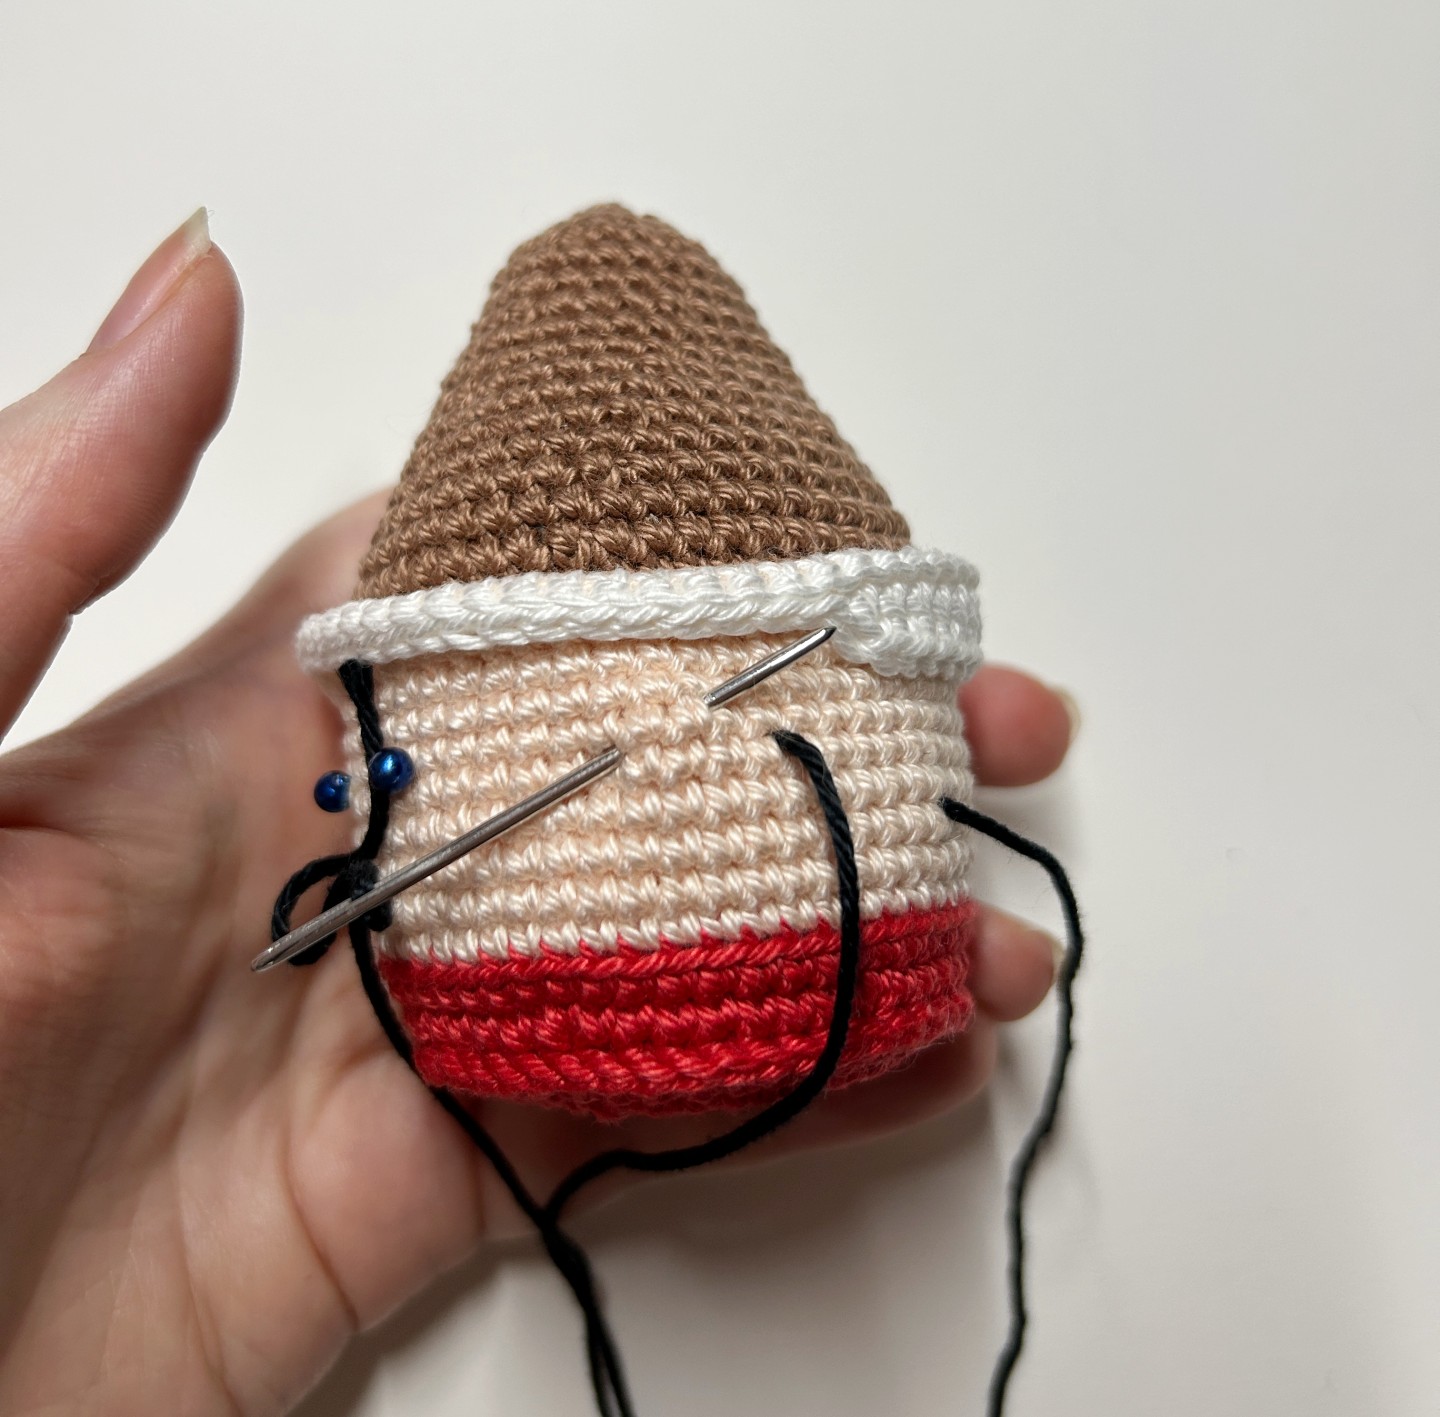
Embroidery eyes
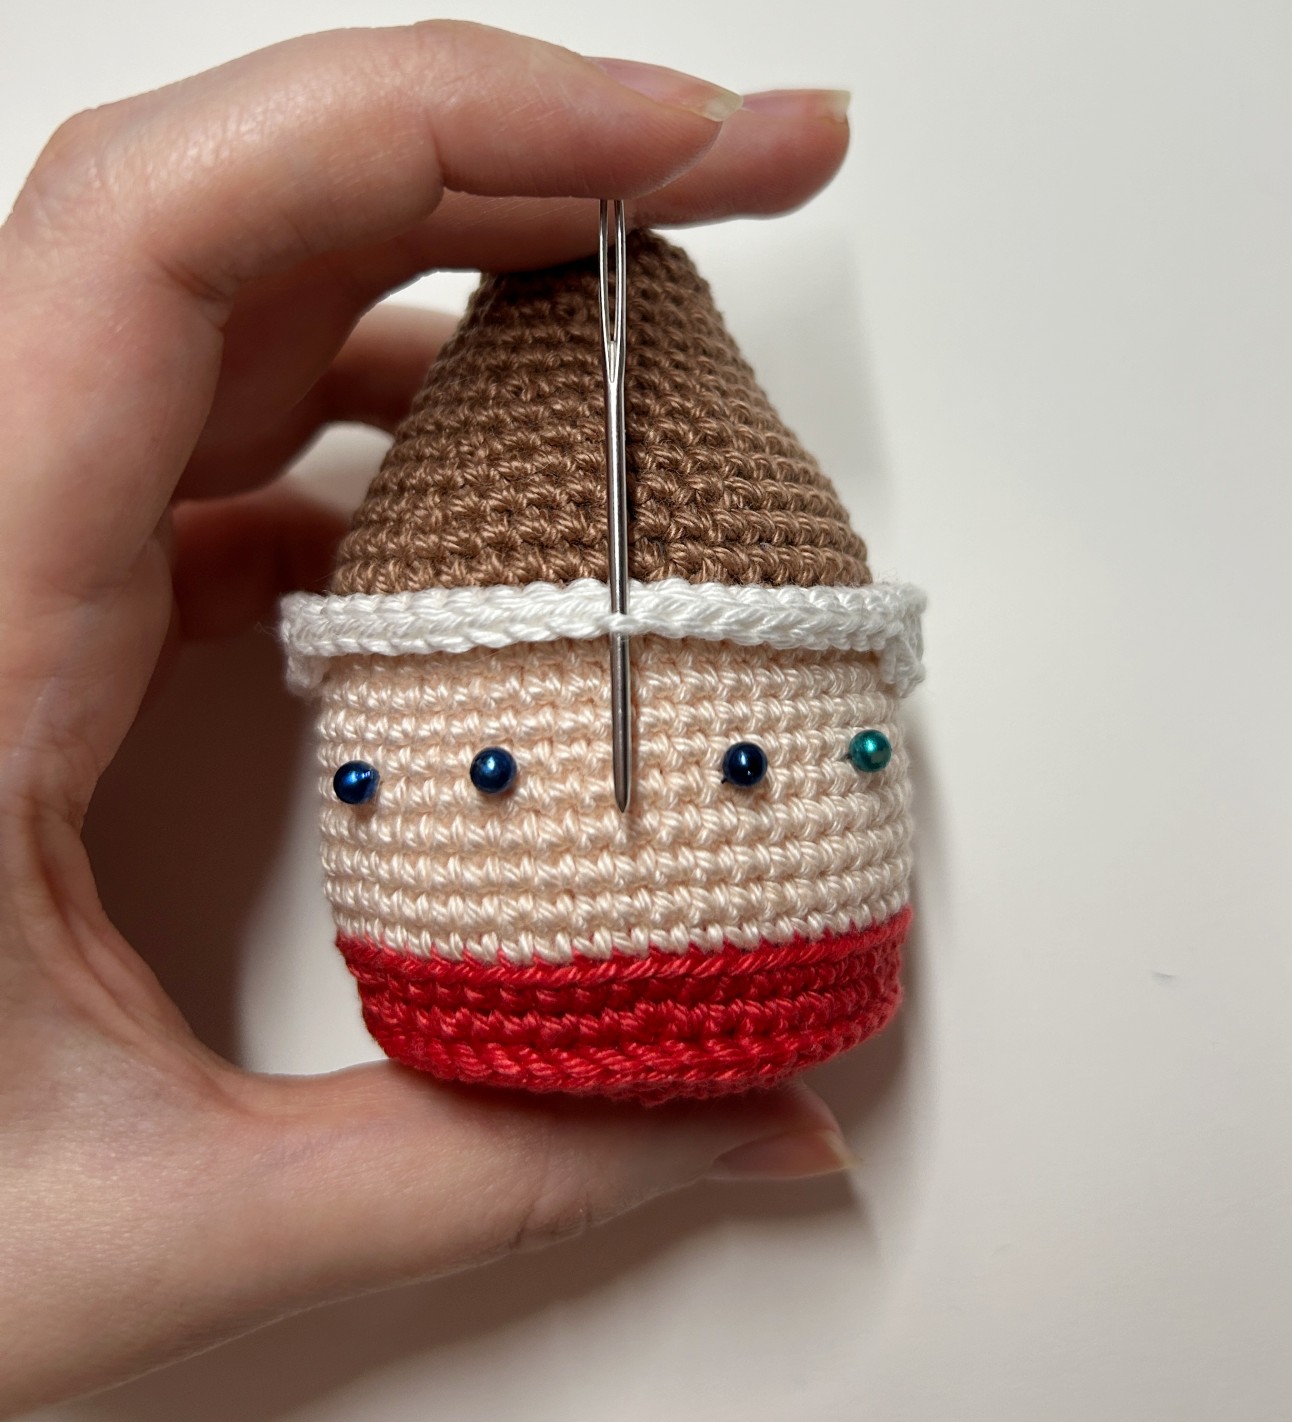
Spot the 10th SlSt on the row of the hair in
front of the cupcake.
Add 1 pin with 3 stitches on the right and 3
stitches on the left (inner corner of the
eyes).
Then, count 4 stitches further to add a 2nd
pin (outer corner of the eyes).
Highlight the black thread in the outer
corner of one eye.
Then insert it in the place of the 2nd pin
(inner corner of the eye) to make it stand
out 2 stitches further and 1 row above.
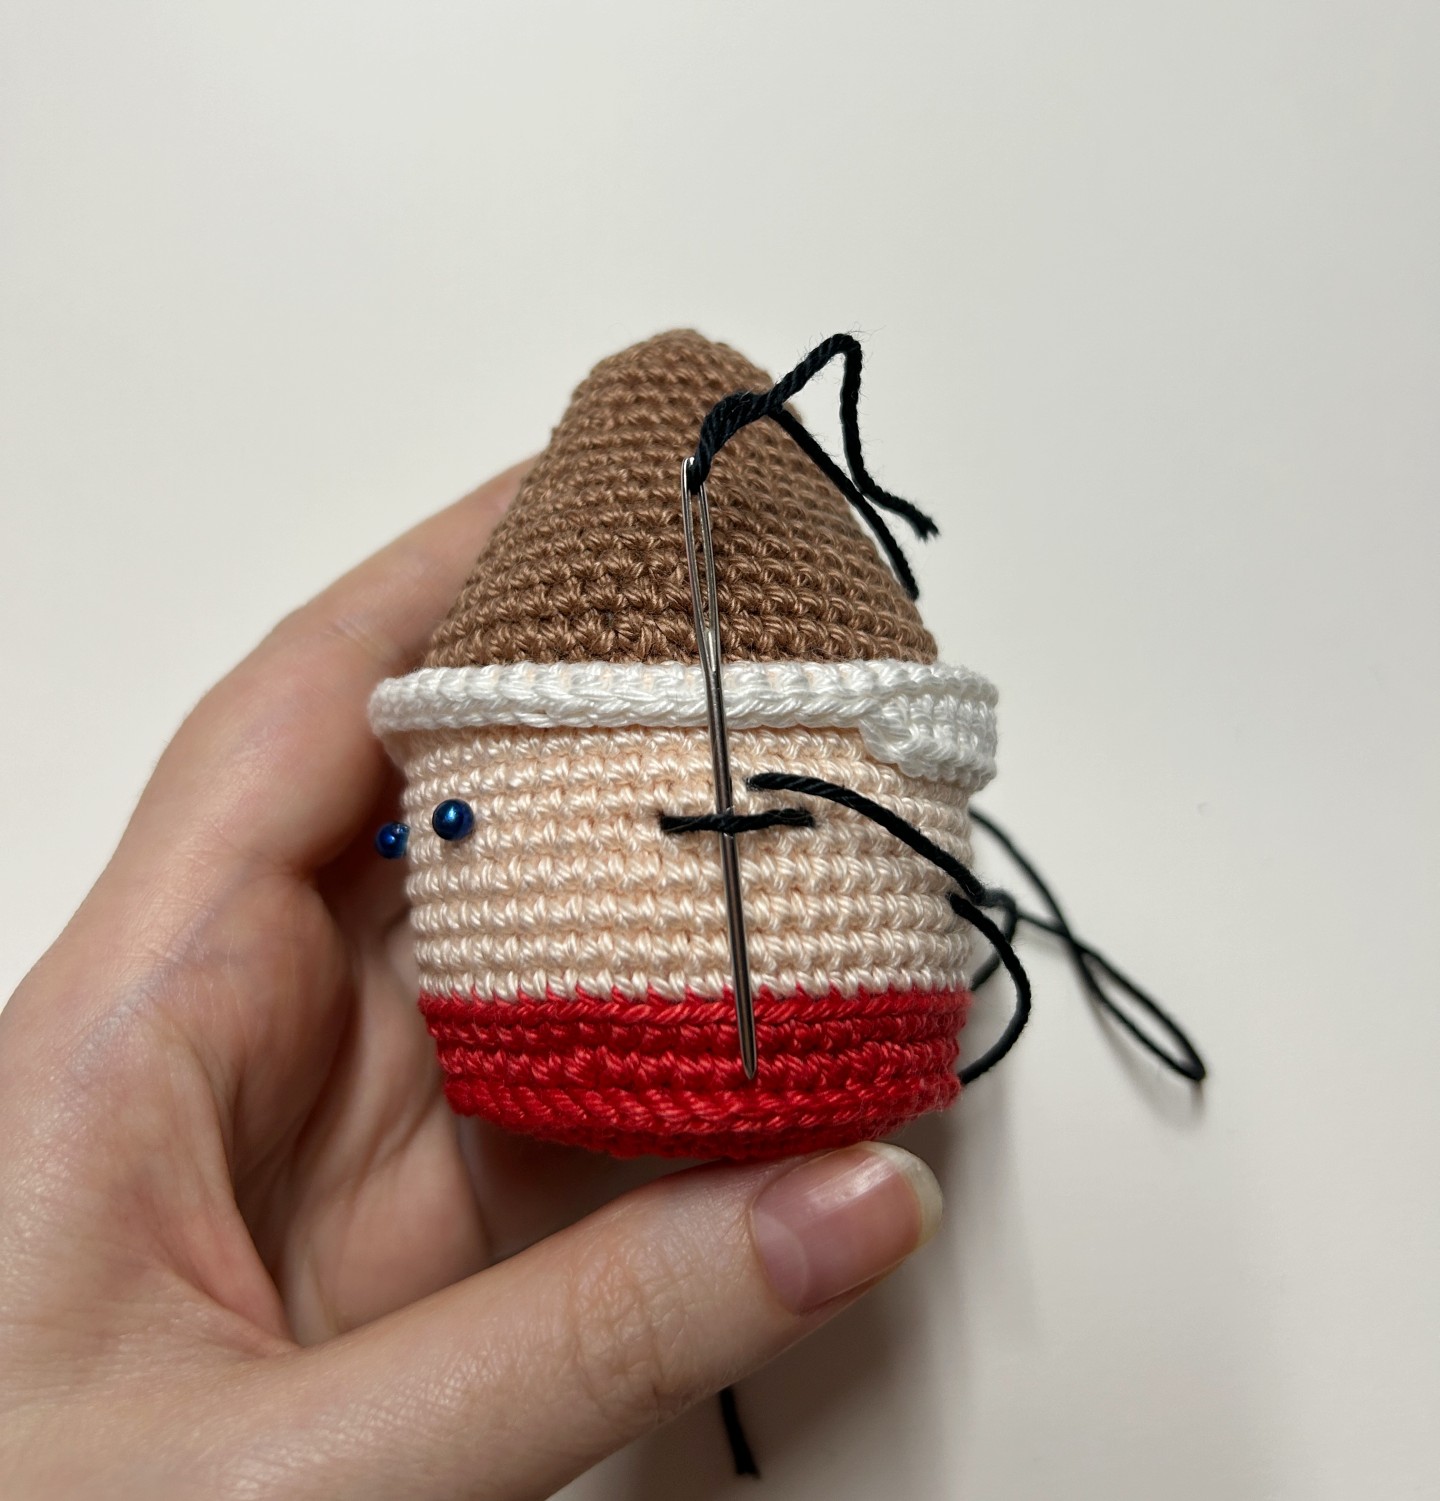
Pass the thread under the line made
previously.
Pass the thread again in the previous entry.
Finally, pull it out by the very first entry of
step 1. Pull a little on the thread to create
this eye arc.
Tie a knot with the 2 threads, cut and
weave in ends.
Do the same thing for the 2nd eye.
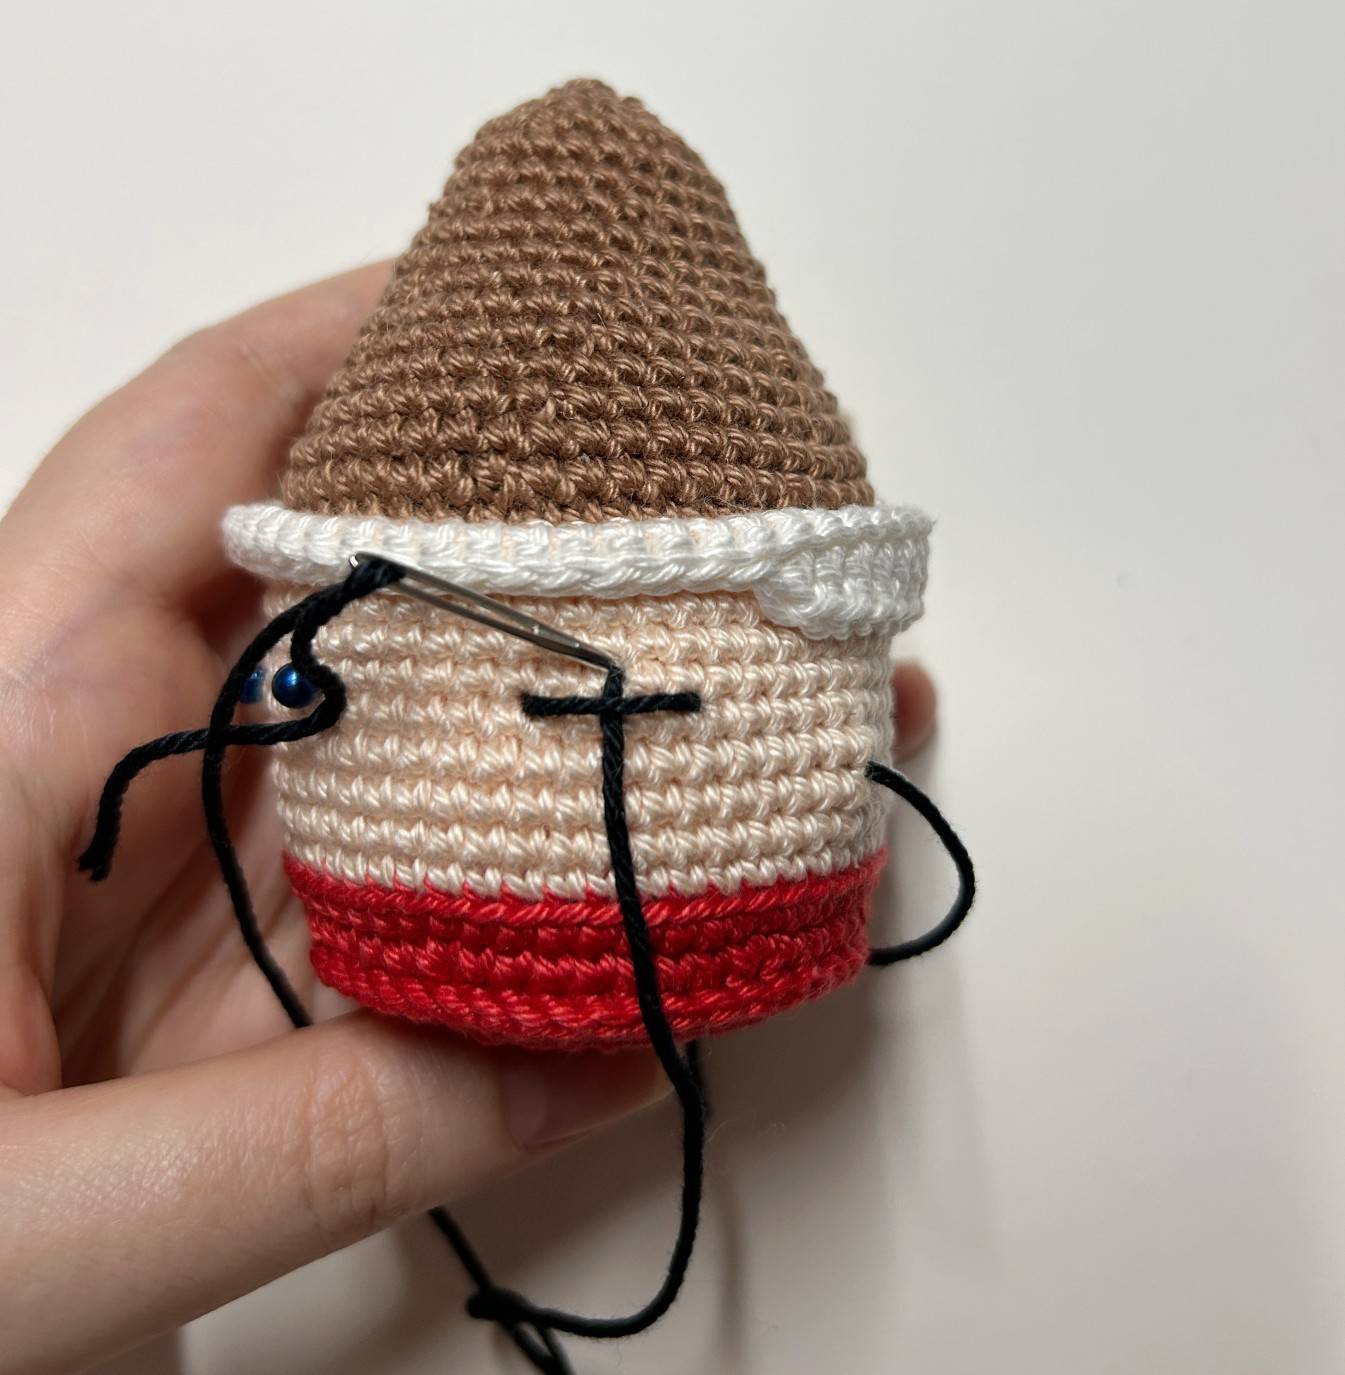
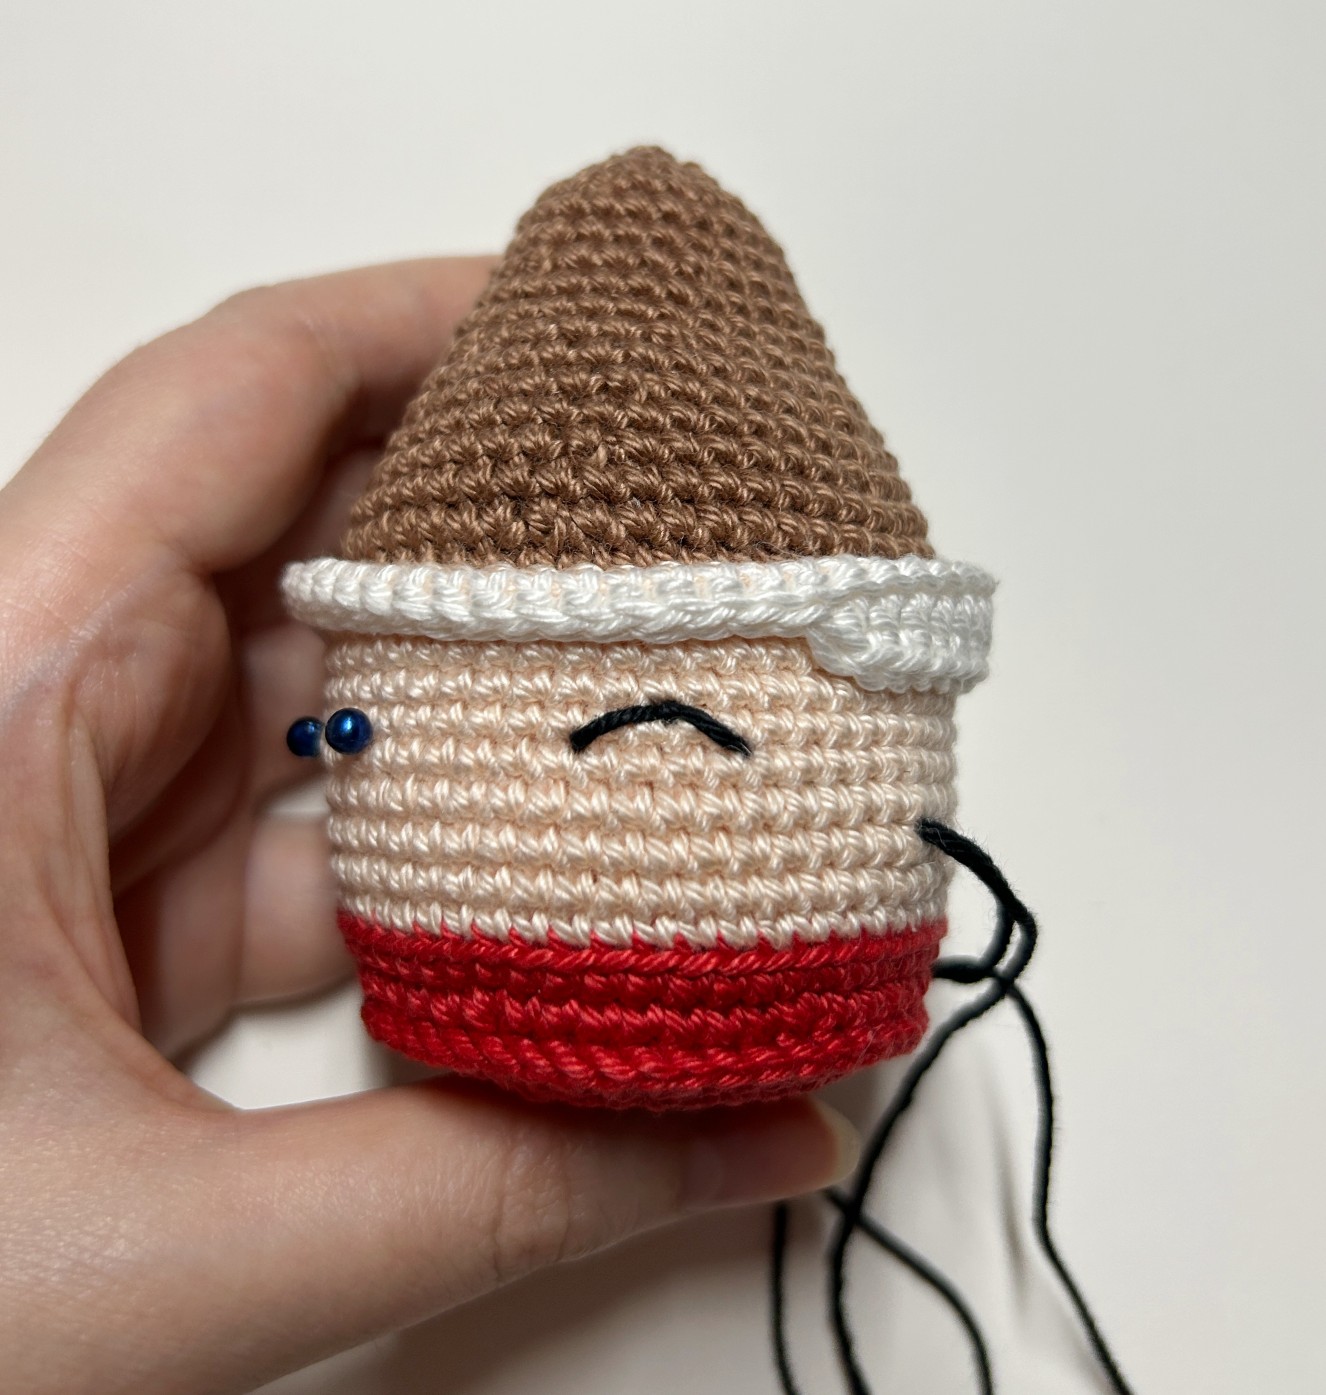
The mustache
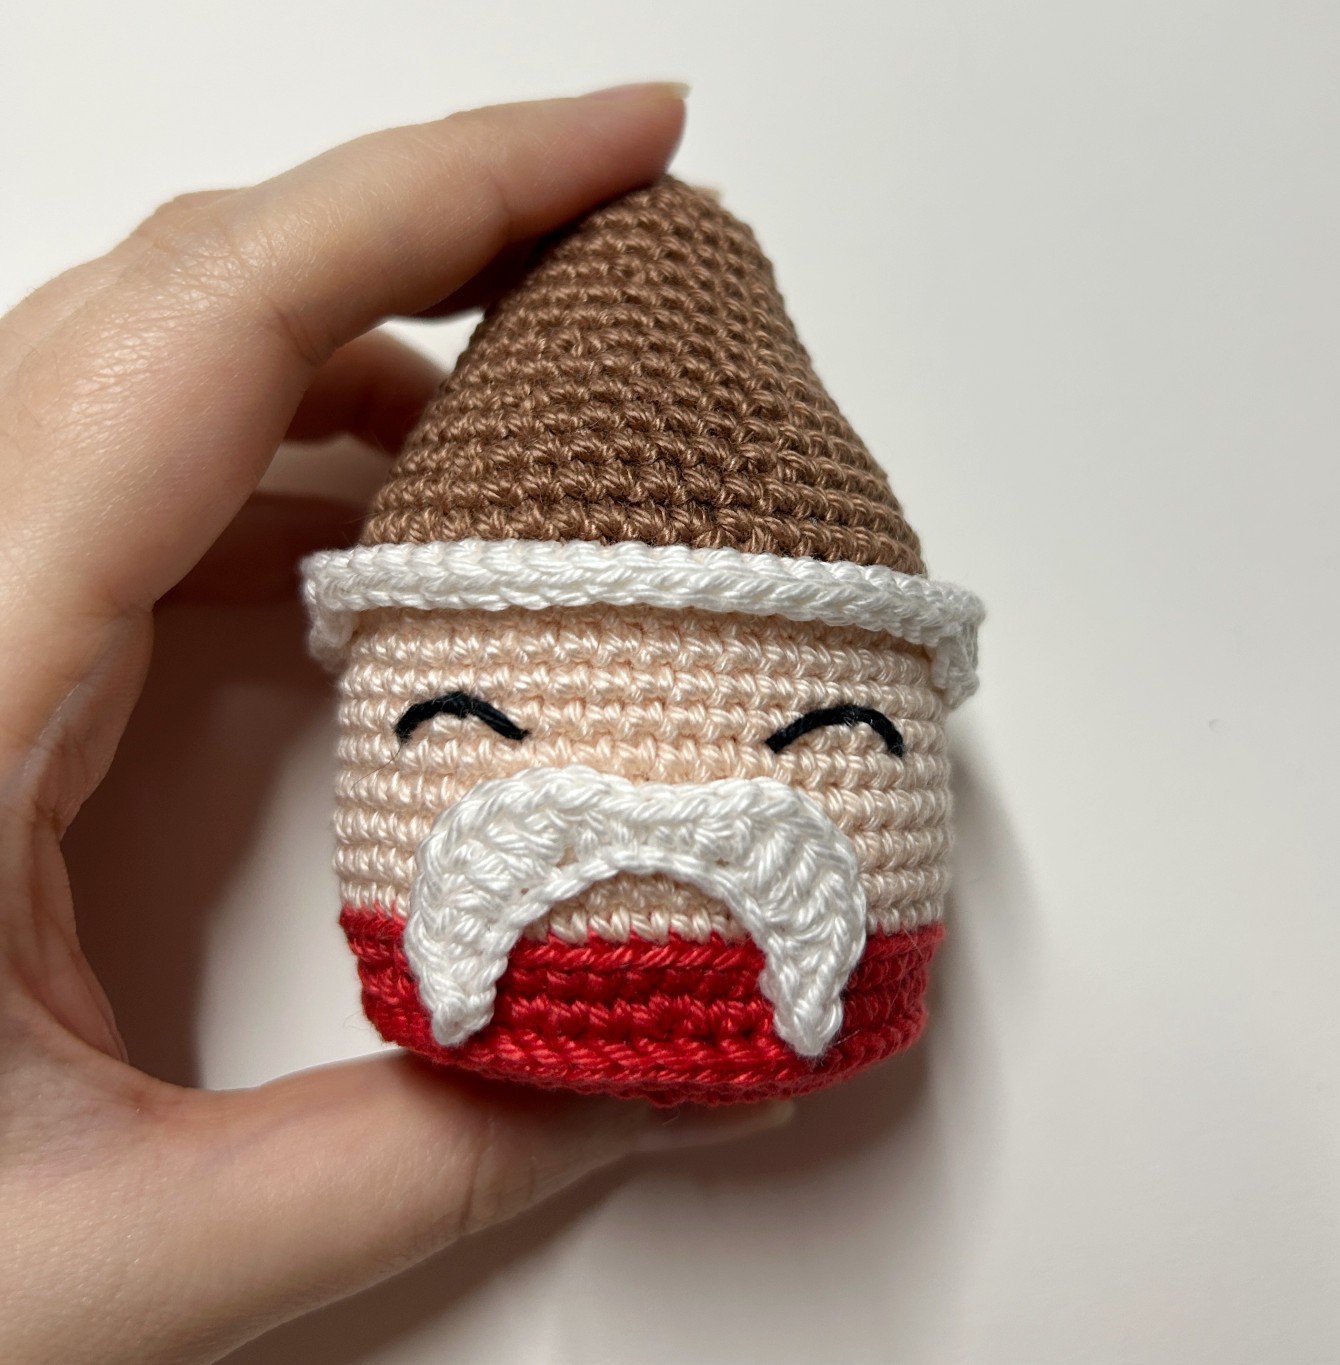
Stick the mustache at 1 row under the eyes.
The middle of the mustache must be at the
same level as the middle of the row of the
hair SlSt.
The nose

Stick the nose just above the mustache,
between the two eyes.
The cream
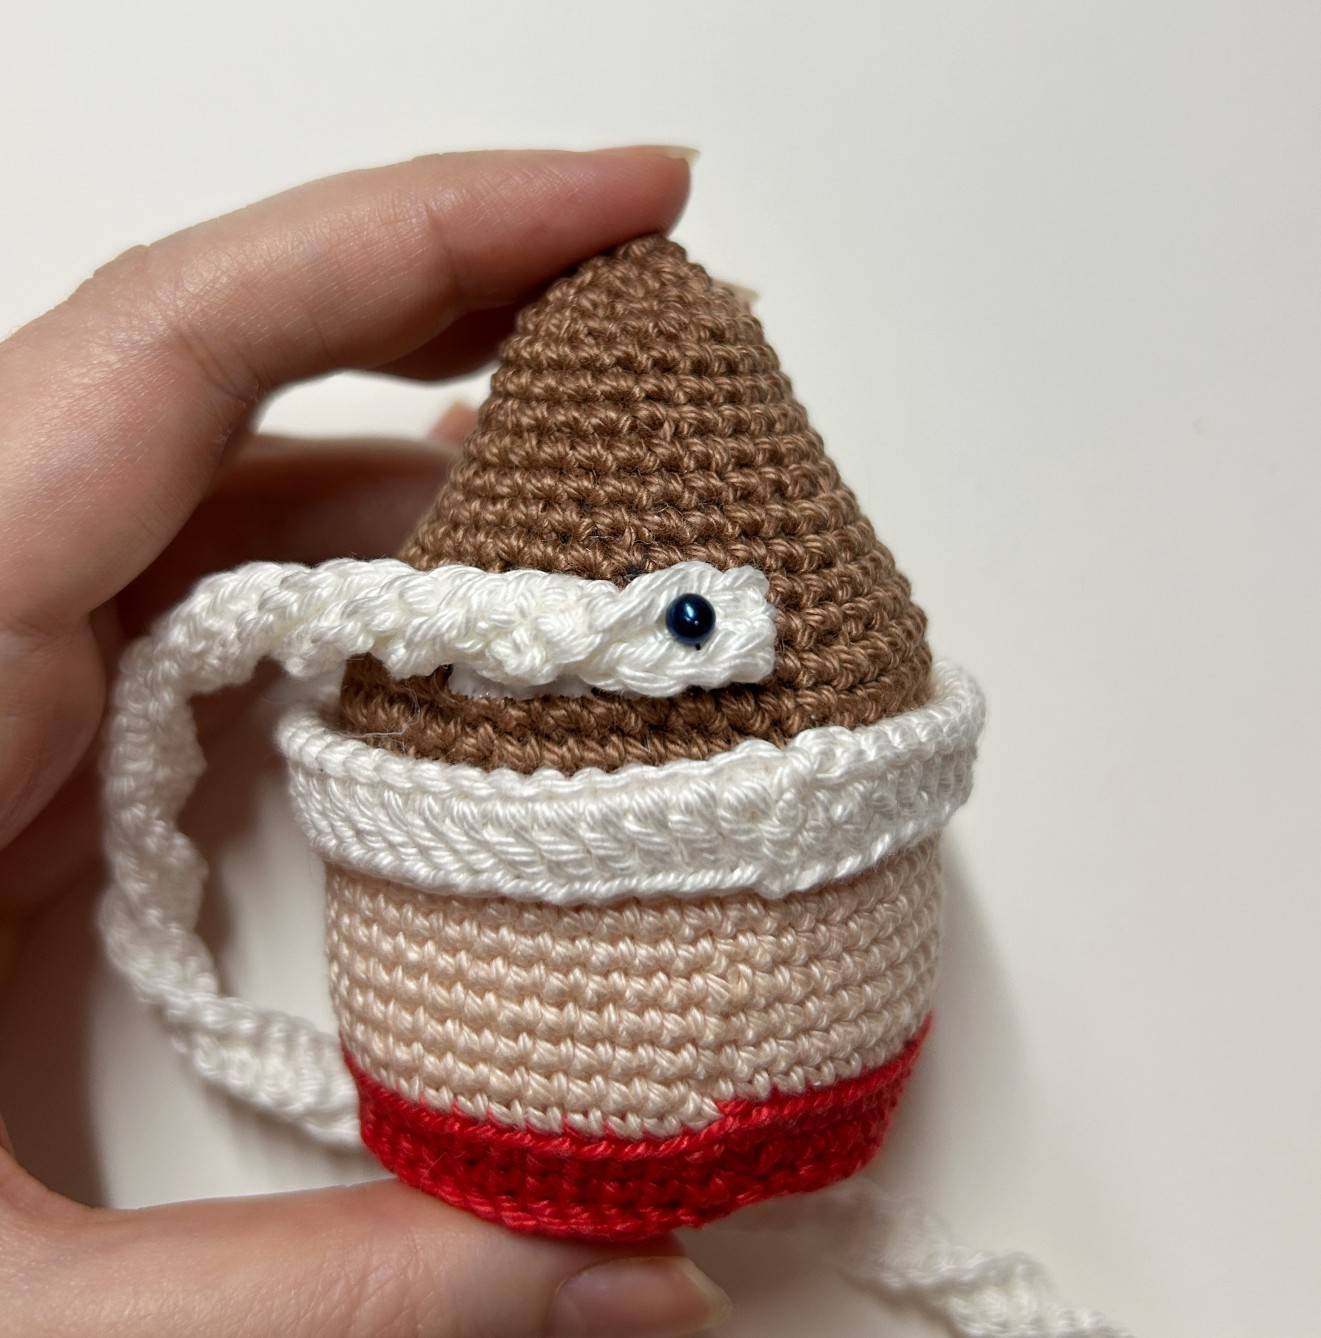
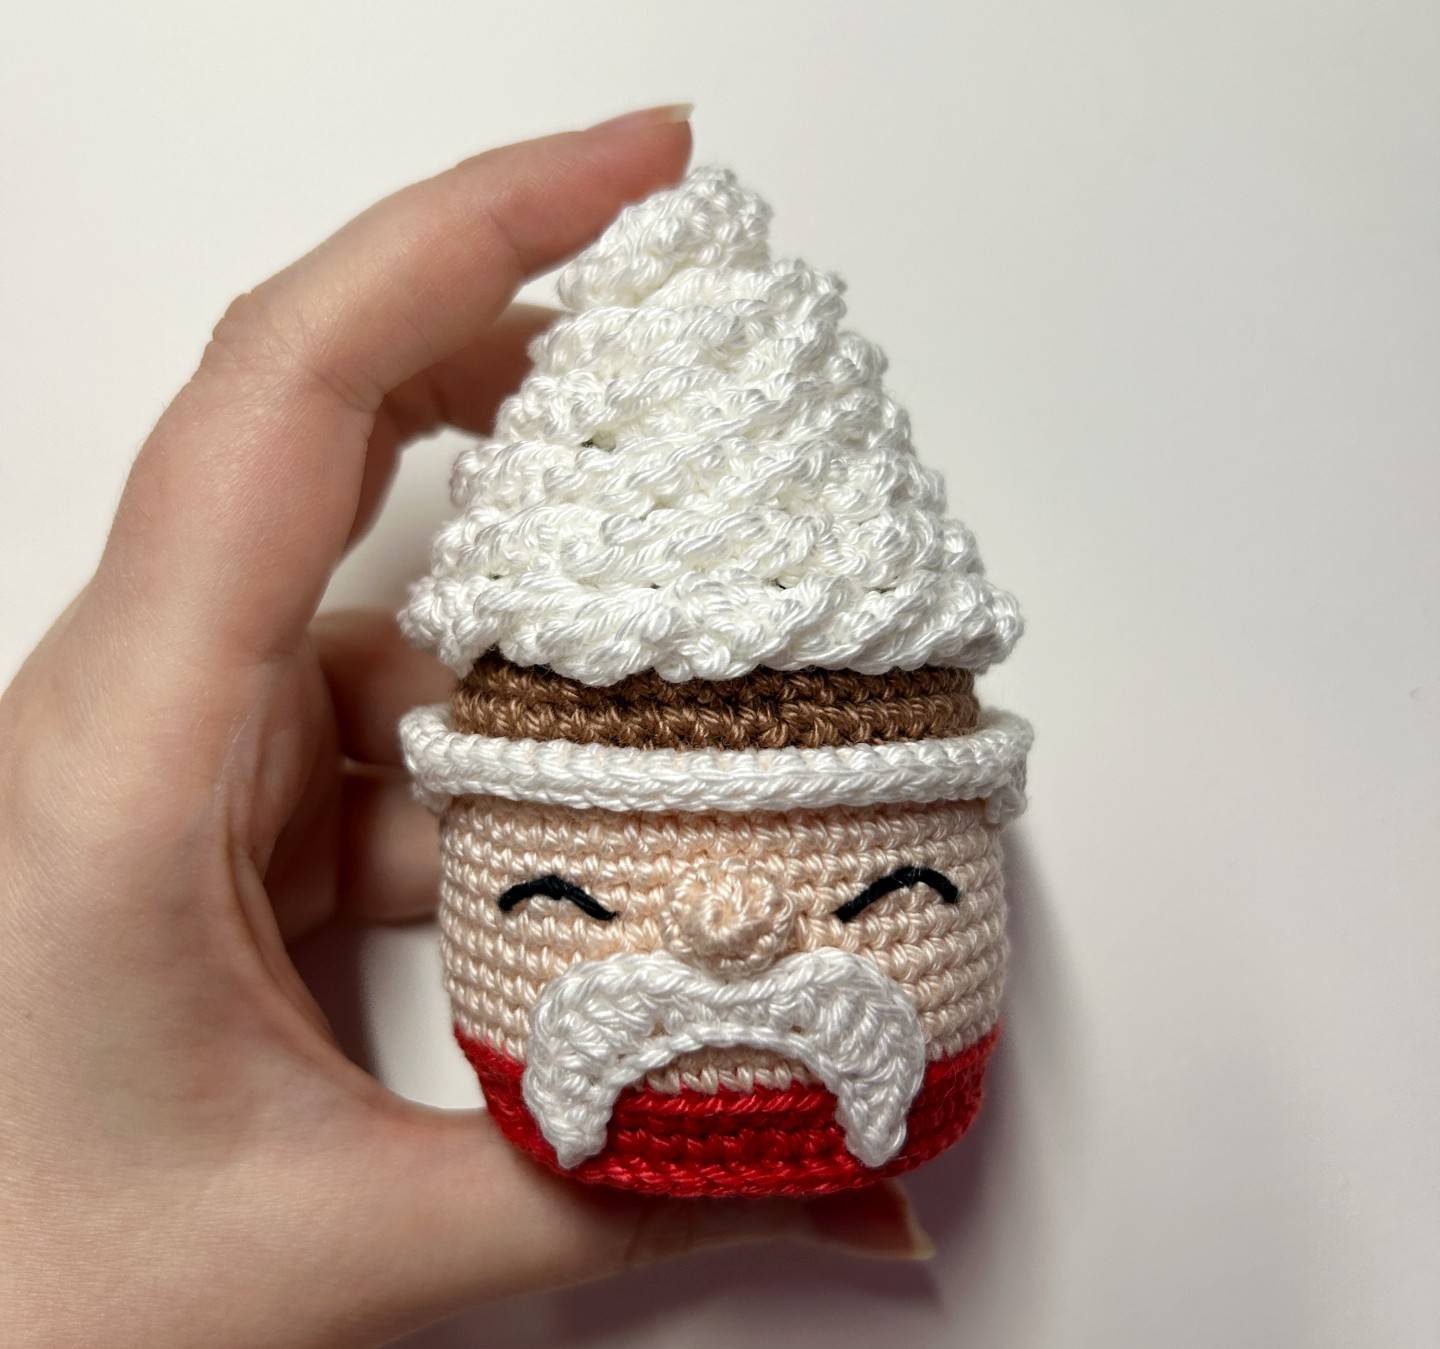
Start to stick from the bottom the 1st end of the cream and from the 3rd row of the
cake, at the back of the cupcake.
Apply the glue to the cake as you go and place the cream on it by wrapping it around the
cone while keeping the twist of the cream to give relief.
We must no longer see the brown part.
Arrived at the top, wrap the rest of the cream on itself.
Use pins to hold the cream to the drying of the glue.
The beanie
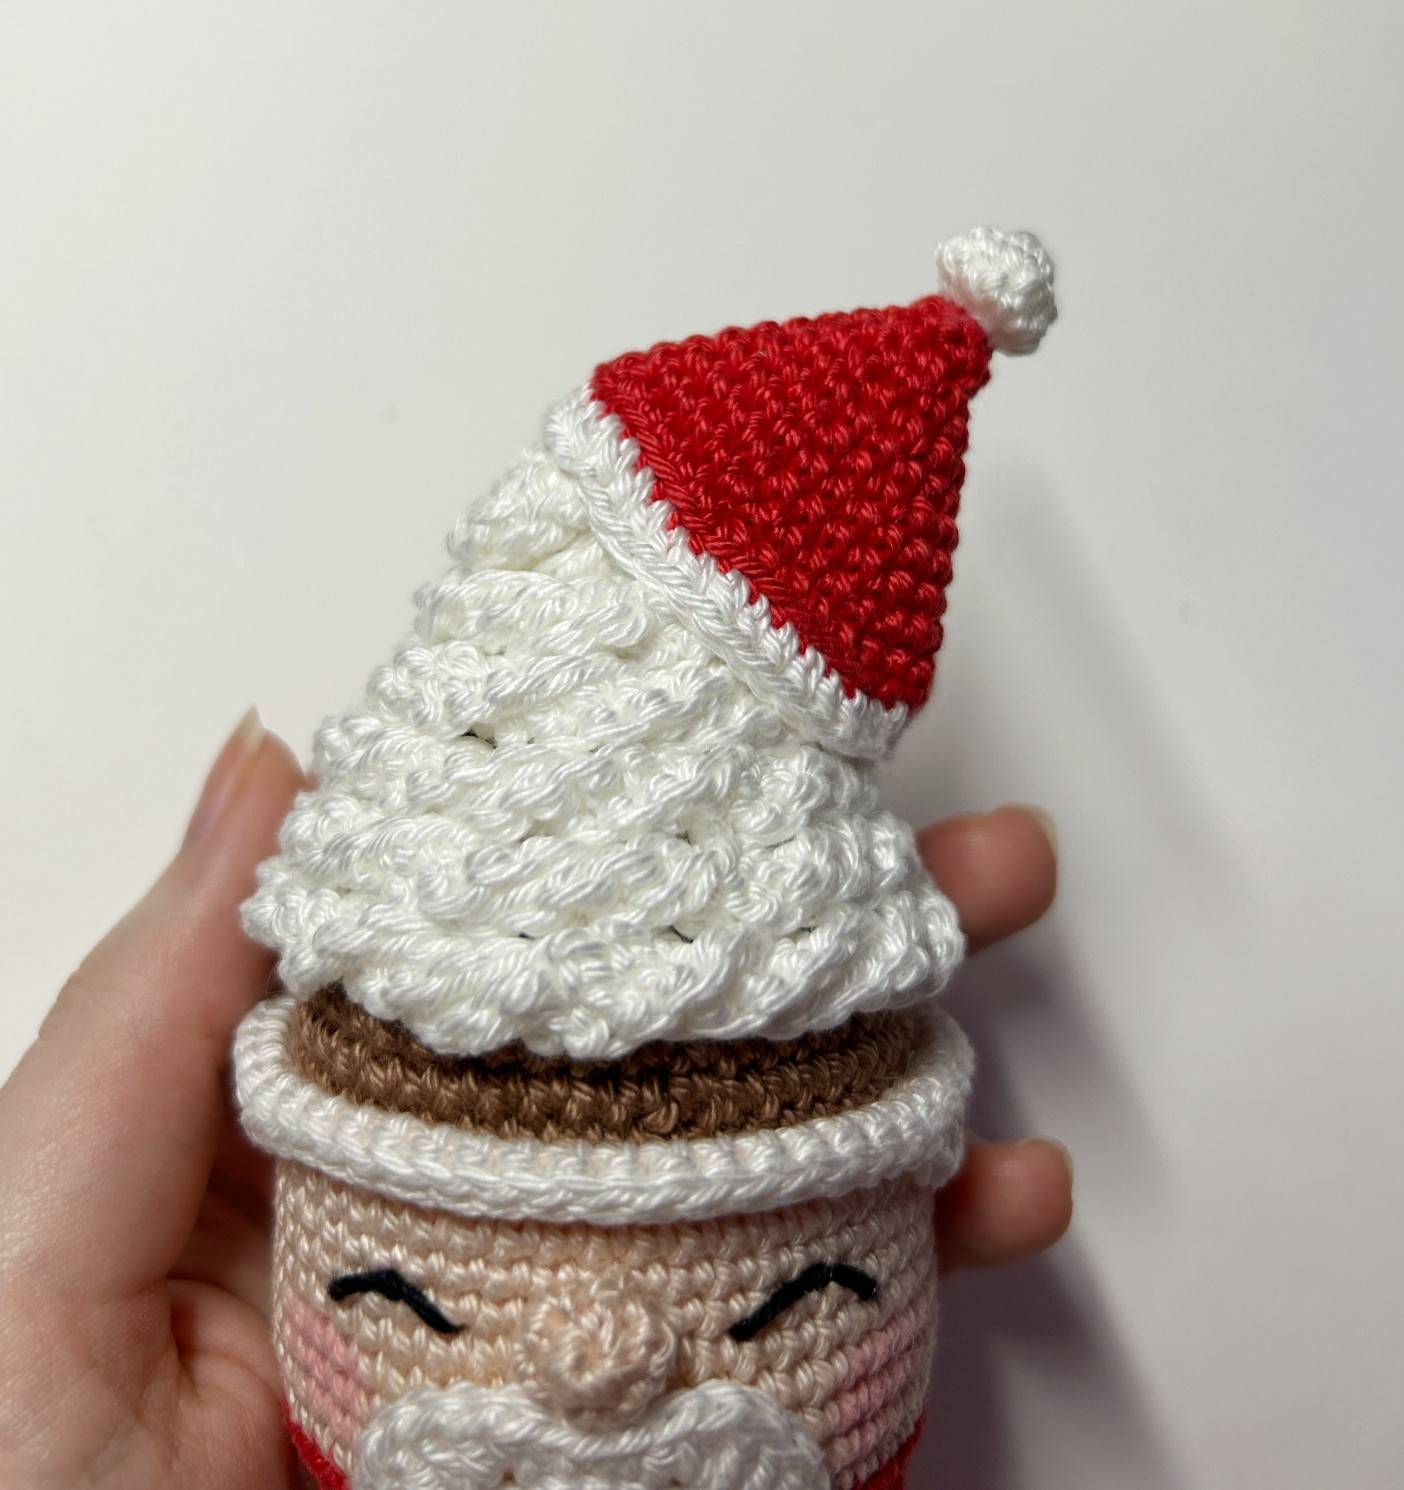
Stick the cap at the top of the cream and
diagonally. The glue must be placed on
the inside of the white border.
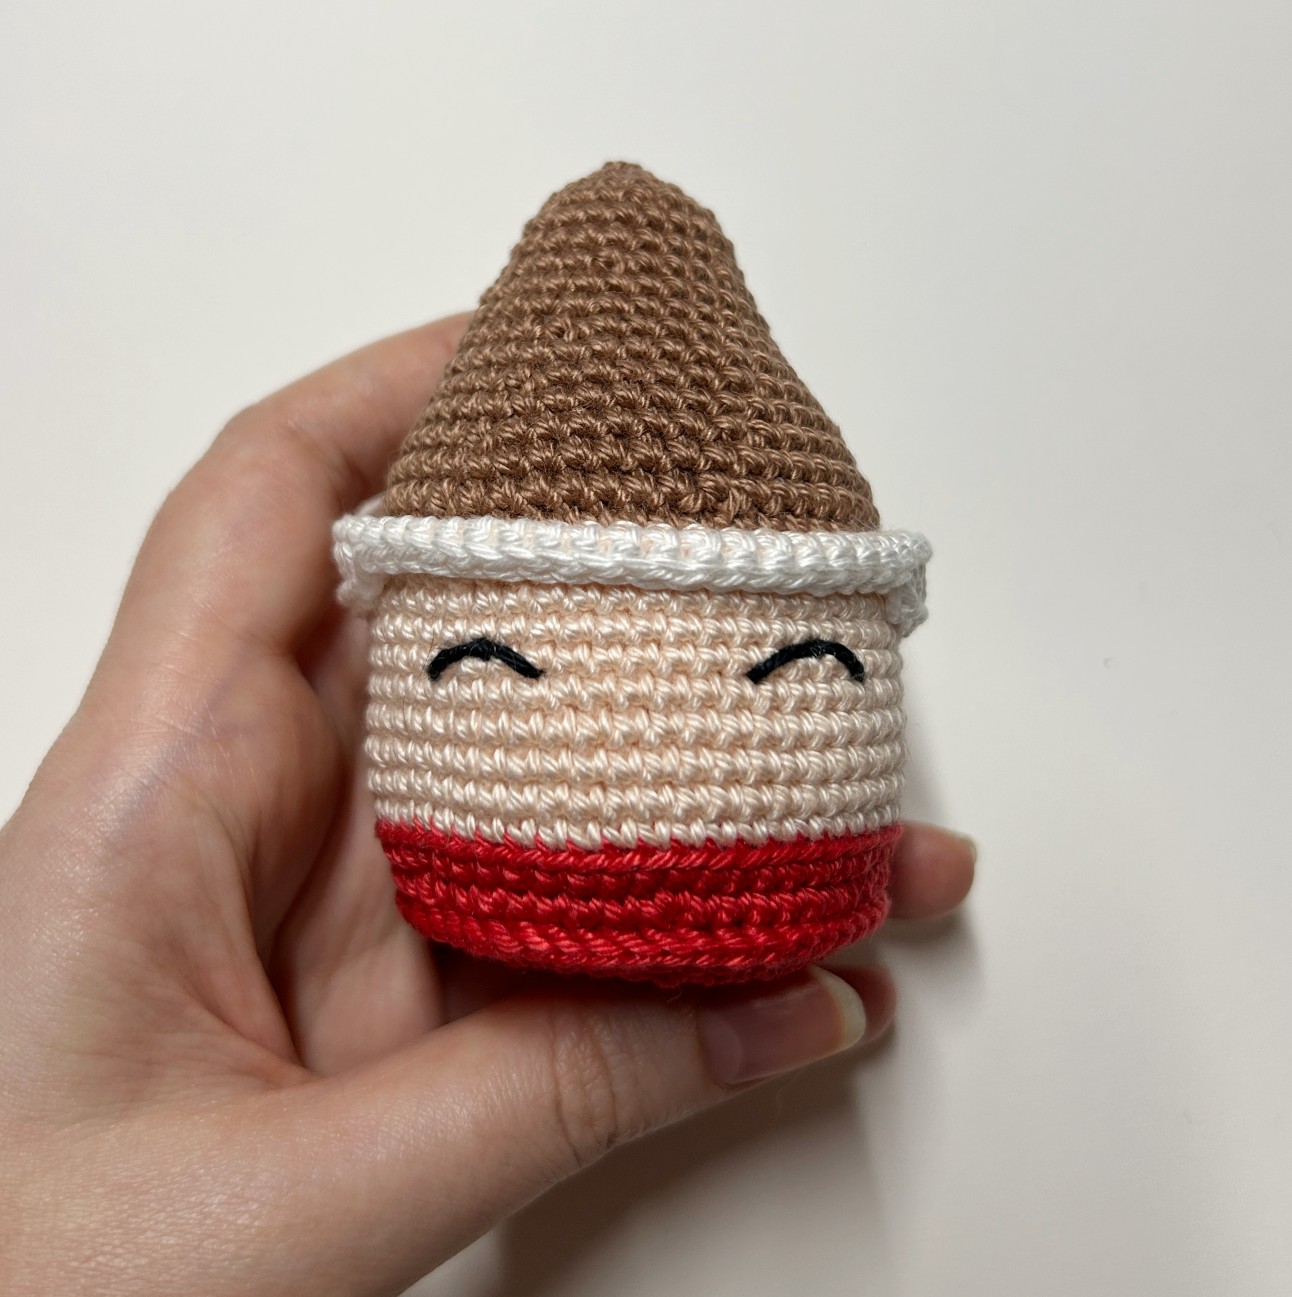
Les joues
With the pink blushe, make up Santa’s
cheeks on each side of the mustache.
If you make this pattern, don’t hesitate to share it on Instagram by tag me @my_rainbow_crochet so that I can pass you on in my story or on Facebook to send me a photo of your achievement that I would incorporate into the album of your achievements!
Seeing your achievements is always a huge pleasure for me!
See you soon Rainbows ! 🙂🌈